

[Blender] Create your first Blender add-on
Create your first Blender add-on
I have offered lending a hand to @Coen in its very interesting path to create custom brick rowlocks in Blender using the python API and I figured I might as well create a new thread to not hinder the ongoing discussion there and maybe attract people with the same needs, share their thoughts, struggles and knowledge.
The goal of this thread is to help newcomers with a background in architecture or CAD software to rapidly prototype their ideas by making use of the blender API, especially the UI. It's not supposed to be very advanced, but rather to create a functioning environment for contained scripts and ideas without thinking about scalability. It is assumed however that you have a bit of experience in Python programming, or in any other programming language for that matter. If not, there are very good python crash courses available pretty much everywhere on the internet.
1. Adding a Panel in the interface
Blender comes pre-packaged with a host of python templates anyone can get ideas from. Within the Text editor go to Templates > Python > UI Panel Simple. A new text datablock should open with a few dozens lines of code. Click on the Play icon to run it.  .
.
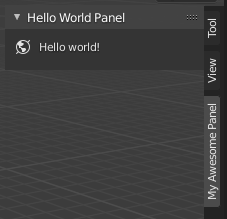
Let's see what we just unleashed in the interface !
Create a new object and go into its properties. It's the orange square icon in the properties editor. There you'll see a new panel has been added to the interface.
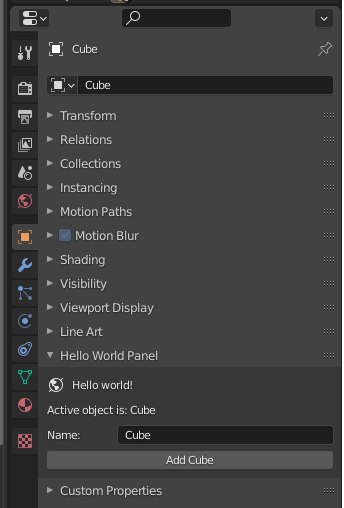
It contains 4 rows :
One label with an icon :
row.label(text="Hello world!", icon='WORLD_DATA')
One label where the object name is displayed :
row.label(text="Active object is: " + obj.name)
One String field where you can actually change the active object's name.
Depending on the object property, the field type is automatically changed to accomodate for the expected value. here the object name is a string object, so the field lets you input a string.
row.prop(obj, "name")
And finally a button (called operator in the Blender API), which creates a new Cube and selects it.
row.operator("mesh.primitive_cube_add")
2. Moving the Panel to the 3D Viewport
I'd like to move this panel into the right hand side panel ("N" panel) of the 3D Viewport, the one you toggle with keyboard N or the tiny tiny arrow in the top right of the interface. 
It's arguably not the best place to put your addon interface because it can get crowded when you enable a lot of addons, but it's alright for prototyping . You can see in the template we just imported that a panel is created by defining a new class that inherits from bpy.types.Panel. Then after the class is defined, there is a call to bpy.utils.register_class(HelloWorldPanel). The API relies on a few instructions just after the class name definition in order to know where to place it and how to uniquely identifying in afterwards. They all begin with bl_ to note they're particular class attributes. We have :
bl_label = "Hello World Panel"
The panel will display like this in the interface.
bl_idname = "OBJECT_PT_hello"
It will be uniquely stored by Blender using this. You can then access its properties from anywhere else in code with this identifier once it has been registered. Note that if you register multiple panels using the same idname, they will be overwritten each time and only the last one will display.
bl_space_type = 'PROPERTIES'
The panel will be placed in the Properties editor. Here are all the available editors in Version 3.0 :
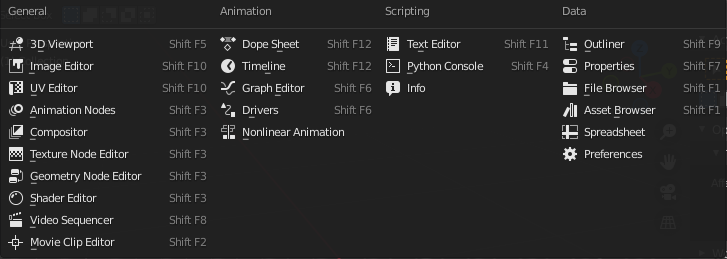
You can note there is an editor type you probably don't have access to, it's called the Animation Nodes editor and it comes from a great add-on. You can create custom editors with the Python API, but you're limited to a node-based editor similar to the shader editor.
bl_region_type = 'WINDOW'
This is a bit trickier. You just have to know that an editor is usually divided in several regions : Header on top, Footer on the bottom, Tools on the left, UI on the right and window in the middle. There are other specific ones and they're not always used for all editors but we won't go into the details here. Usually all the regions but the window region can be collapsed.

bl_context = "object"
This places the new panel inside the object properties. You can place it in the scene properties, world properties, etc.
How do we place it inside the "N" panel of the 3D Viewport editor ? If you have already scripted a little bit in the Scripting workspace you must have seen blender's pseudoconsole in the bottom left corner. You'll notice that new lines appear when you click on buttons or change things in the interface. It's a great way to learn how things are called internally. Don't depend too much on it though, because not everything is printed out there, especially not all python errors, and some commands are obfuscated by design.
Back to the previous point where I explained the Properties editor has several contexts that you can add your panel to. Try clicking on the scene icon for instance and this will be printed in the console :

The rest of the explanation works best if you delete all objects in the scene. (Select > All and Object > Delete)
If you change bl_context = object in the panel definition to bl_context = scene, you'll notice that it now appears in the Scene panel.
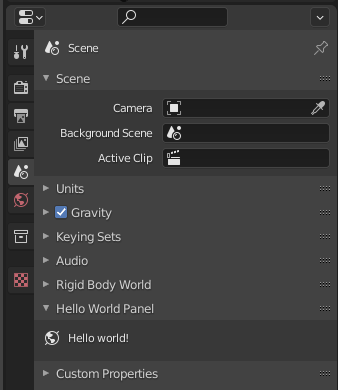
I honestly have no idea why we have to use lowercase words here when everywhere else in the code we have to use capital letters, but I'm sure there is a good reason. Also, now that we moved the panel and deleted all objects, only the first label appears, but not the others rows where we could spawn a new cube and change its name. We'll tackle that in a bit.
How do we know what is the bl_space_type of the 3D viewport ? Simple, change any editor to the 3D viewport editor and look at the console ! VIEW_3D

We want it to appear on the N panel, which by convention is called the UI region.
But the UI region type doesn't have contexts, it has categories. You can name your category however you'd like to.
So the few lines after the class definition and before the draw function should look like :
bl_label = "Hello World Panel"
bl_idname = "OBJECT_PT_hello"
bl_space_type = 'VIEW_3D'
bl_region_type = 'UI'
bl_category = "My Awesome Panel"
Run the script again. The panel appears in the N panel !
You'll also notice the error in the console, which causes the few missing lines to not be displayed :
Python: Traceback (most recent call last):
  File "\ui_panel_simple.py", line 21, in draw
AttributeError: 'NoneType' object has no attribute 'name'

location: <unknown location>:-1
It's complaining that it can't find the name of the active object, but since we deleted all objects, we don't have an active object ! Add a new object, select it, and it all should be good.


 and 4 others.
Comments
3. Customizing the interface
This panel can save you something like 2 or 3 clicks. Not really worth the time you put into making it happen is it ?! Let's make it a little bit smarter and interesting by expanding its functionality. Instead of creating a dumb cube, we want to create a cube, with custom dimensions ! And we want it to update in real time when we tweak its dimensions !
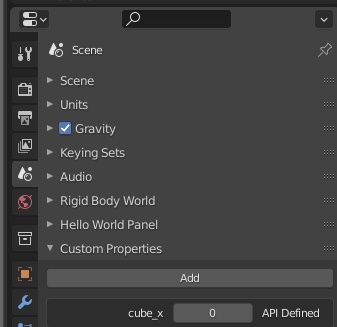
First let's add an integer property to the
Scenetype. This will add a custom property of typeIntPropertyto all scene objects in the file. Then, we can call this property in a field to change it in our panel.The
registerfunction now looks like this :This property will be used to drive the cube's x dimension later on. We need to tweak the
drawfunction to show it as a slider :Now you can scrub all you want, and the scene property will be updated automatically. They're functionally the same property, just accessed by a different means than in the Properties editor's custom properties panel.
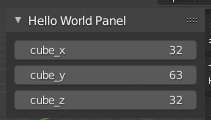
Rinse and repeat to get the y and z to display too :
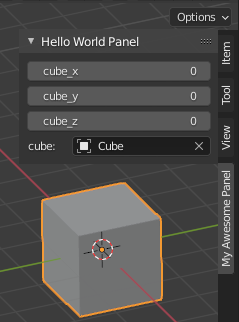
4. Selecting the target object
Using the API, all objects that inherit the ID type can be stored as a reference using a field with a PointerProperty. We'd like to select an existing Object to dynamically resize it.
Add this line to the
registerfunction :And these lines to the
drawfunction:Run the script, add a cube in the 3D viewport, then use the pipette to select it or click in the field and select its name.
5. Making Magic Happen™
We'd like for the cube to be dynamically resized when we scrub the property fields. Luckily the properties provide us with an Update method which fires a callback function whenever the user changes its value in the UI. We can see in the docs that we can also set a minimum and a default value.
The update callback automatically provides the function with 2 parameters, the first one being the property that fired it, and the second one being the current context. The context is a data container which helps us retrieve information about what's going on in the blender interface, and a direct access to the objects that are being worked on, like the
context.scene.First we define the update callback :
Then we change the register function line where we define the IntProperties :
Run the script, select the cube. Now scrub the dimension field to see the magic in action :

6. Making full use of the API
Nosing a bit around the documentation, we can see that instead of integer fields, we can use float fields, which let us define the dimensions with more granularity.
Even better, we can use FloatVectorProperty which let us create an array of float values.
Register (Note we're using another parameter which lets us define a display name, by default the UI uses the variable name where we can't use spaces for instance) :
Draw :
Update callback :
You may have to expand the panel horizontally to get the fields to display their numbers correctly.
7. From script to add-on
Using a script is pretty simple, but the major drawback is you have to go into a text editor and copy/paste it or load from a file to make it run, and all changes are lost when you quit Blender and re-load it. It's fine when you're testing things out and making a lot of adjustements, but if you're not making any changes, having to load&run it every time you launch Blender can be a hassle. Making it into an add-on persistently adds the functionality to Blender and you don't have to worry again about running it.
There are a number of bits of information that are needed by Blender to know how to turn a simple script into an add-on. Hopefully it's pretty straightforward.
Add these lines in the first lines of the script :
We also have to worry about one thing which didn't bother us until now : Unregistering all the features we enabled with the add-on once we want to disable it. It can be nice to disable specific addons because they all add, even if it's only in the slightest, to the computations that Blender has to do each frame. They also often add properties to some objects like we did with the Scene object and it can be bothersome, or even add to the file size.
Fortunately the panel template provided us with a
unregisterfunction which already took care of unregistering the panel. We just have to add instructions to remove the link to the scene custom properties we added :With your script selected in the Text editor, go to Text > Save As and save it somewhere on your PC. Be sure to add a
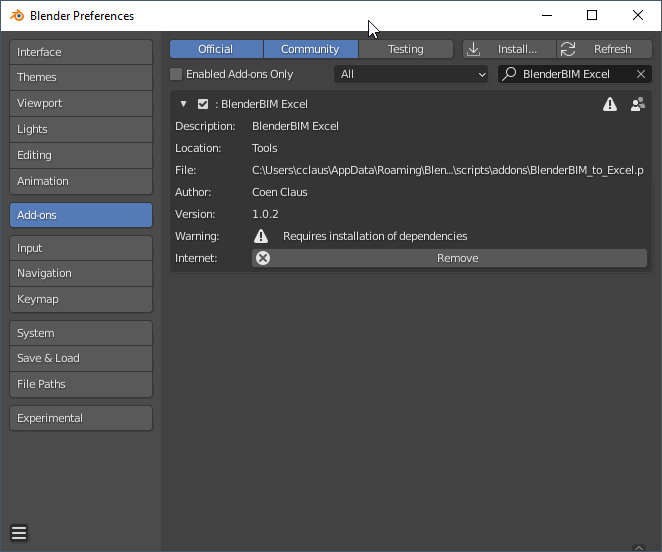
.pyextension, that will help Blender recognize it as a python file when registering the add-on.Then, make sure to quit & restart Blender to wipe out the interface changes you made with your script, and go to Edit > Preferences > Add-on > Install and pick the file you just created.
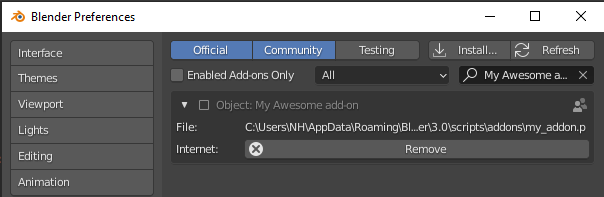
The interface should update and hide all other add-ons, and present you with a single, inactive addon.
Click on the checkbox in the top left to activate it. That's it ! Your add-on is registered. Now when you quit & restart Blender, the panel will still be there. And when you disable the add-on, the panel will disappear and the scene objects won't automatically spawn with your 2 custom properties. Click on Remove to permanently delete the add-on from Blender. Note that it won't delete the python file you originally saved, but it will delete the file it created (a copy of the first one) in the AppData/Roaming/Blender Foundation/Blender/your version/scripts/addons/my_addon.py (on Windows at least). The actual path is labeled just below the add-on header in the preferences.
This is the final form of the add-on :
8. Addendum
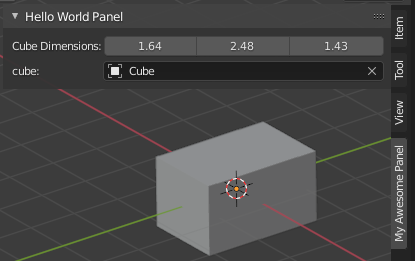
One important thing to understand in Blender interface is that UI elements are only "for show" shortcuts to the actual data. The actual data is not directly tied to how it's displayed in the interface. A piece of information can be accessed from different areas in the interface. For instance, the object transforms can be accessed via the N panel "Item" subpanel, AND via the object properties' "Transform" panel :
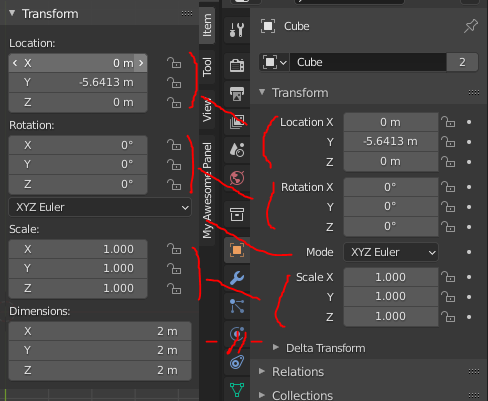
They display the same data, but they are presented differently. Note that the final part of each panel is different : In the 3D viewport, we have access to the object dimensions, whereas in the properties editor, we have access to the Delta transforms.
I'm bringin that up because, if the only functionality of our add-on is to manipulate the object's dimensions, why wouldn't we just display these fields ? We can cherry-pick these properties and display it as we wish. We don't even need fancy callback functions because we will be directly manipulating the data.
9. Troubleshooting
Don't forget to re-run your script when you made changes to see them in effect. That's the "Play" icon.
If you want Blender to forget all the changes you made in your script, simply quit and restart.
10. Epilogue
That being said, if you wanted to specify custom functionality, or custom constraints, like the Z dimension must not be > 2.5 units or Y must be at least 2 * X, you can do it pretty easily with the way we designed our add-on. It's just an illustration to serve the point.
If you're interested but feel lost, that's normal. There's a world of possibilities out there. I suggest looking around Blender Stack Exchange python questions, like this one https://blender.stackexchange.com/a/57332/86891 (might be outdated on some aspects, but it's a great resource). The great thing about Blender scripting is that the source code of all addons must be disclosed when they are distributed. It means if you want to imitate a particular feature you witnessed in another addon, you can dive into its files and extract out the lines you want to use for yourself. You do have to respect copyright rules though. But if you're creating internal resources, that shouldn't be an issue. IANAL so don't quote me on any of that. :)
I hope that was an easy enough to follow introduction and I'd be thrilled to hear your feedback and give pointers if some of you are interested in going further. :)
You should add a poll() function in the panel class in order to check conditions where the panel is available, in this case as you need an active object :
Absolutely amazing!
@Gorgious you are indeed, as I already thought, an awesome individual :) If only you'd written this a few weeks ago when I was trying to learn by myself, you would've saved me a hell of a lot of time. Great stuff!
Thanks. I think this should be in the Wiki.
Thanks everyone for the feedback :) Don't hesitate to ping if you want more information, I'd be happy to help, even on unrelated or more advanced topics. (if I know the answer of course ^^)
Yeah you're aboslutely right ! I figured this was a little bit too advanced for the point I was trying to make, but that is a great addition. Thanks :)
Ho, right the format would be better suited to the kind of in-depth explanations I'm trying to make. Do you know who is in charge of giving pointers about the wiki, and where it would be best suited ? Or I may as well ask on the the Osarch chat.
Cheers !
Amazing work @Gorgious !!
This is really great. And yes, it would be great if you could add it to the wiki, I think the best fit is the Starting to code category, so I created a page for you:
https://wiki.osarch.org/index.php?title=Create_your_first_Blender_add-on
Thanks ! I'll start working on it then :)
How do I acces the mesh object in the method
update_cube_dimensions?I able to acces the x, y and z, But I want to copy the object.
My attempt at copying the cube.
obj = context.scene.cube
new_obj = obj.copy()
obj.users_collection[0].link(new_obj)
By the way,
x, y, z = context.scene.cube.dimensions
This might be an enormous stupid question, but googling gave me a lot of results, but not the one I was hoping to find.
How do I add a button which calls a function which prints "Hello world" for example ?
Because in all the examples I could find the buttons directly call something within Blender.
I want to be able to make a custom button which does something outside of a Blender.
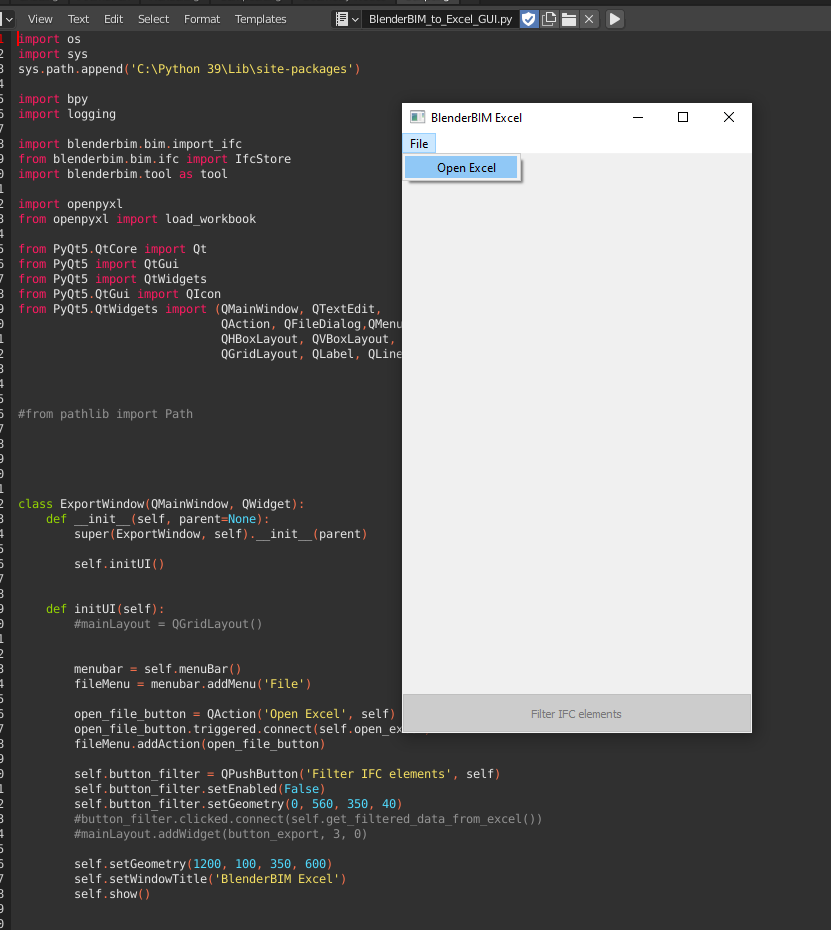
In this example I see
Which makes this menu
But I want to make a button which says:
Open Excel: path/to/your/excel_file.xlsxBlender uses operators for that. See: https://docs.blender.org/api/current/bpy.types.Operator.html
If your bl_idname is "wm.hello_world", you add in the ui:
Buttons in Blender are interface elements to run operators which are defined in code. You cannot just define the behaviour of clicking a button with (dummy example code)
if layout.button(): print("Hello World")like you would in other python interfaces.If you want to familiarize yourself with the API I cannot recommend enough playing with the templates which are shipped with the soft. In the script editor go to Templates > Python and choose which one you'd like to explore.
This is for example what is shown when you click on "Operator Simple"
If you run the script in the text editor, create an object, select it and go in the 3D viewport to Object and look at the bottom of the menu, you'll see an entry saying "Simple Object Operator".
Clicking it will print the object into the system console. This menu entry is an interface to the operator defined in the class
SimpleOperator. It's not a button per se but we'll modify the code slightly to display a button using the "UI Panel Simple" template.Result :
To be more complete: these operators should be seen as the functions of Blender. The thing that is executed is the 'execute' function, that always has one parameter (context). They usually return {'FINISHED'} to let Blender know they are done, but there are special types of operators that can return something different. For example, if you want something to run continuously, you should take a look at the modal operators (because Blender usually freezes when executing a python script, but with modal operators this works a bit differently). You will always need to register operator classes, same as UI classes.
EDIT: didn't see @Gorgious answer there, of course he does a better job at explaining :)
@Coen i feel your pain ?. A few months ago I had no coding knowledge + I had no idea how Blender worked. Figuring out how to create buttons took me longer than I am willing to admit ?. What timezone are you in? I can go through it with you if you want? I find I'm inspired by the words of this random internet dude: https://blender.meta.stackexchange.com/a/2825/130742
Well it's hard to explain too because there is SO MUCH STUFF to learn :) (And also Blender as a whole has a tendency to not follow all the standard guidelines) But with dedication and a good community to help out, things start to shift into place at a good pace thankfully !
Haha @LaurensJN honestly I think your answers are a good introduction and conclusion to mine, they compliment each other nicely :)
Thank you for all the answers, wans't expecting making a custom button would require so much work, hehe.
I have experienced this firsthand, when trying to program a GUI with QT in Blender. I rage quit because if you had some syntax wrong, Blender would just crash. That is not workable.
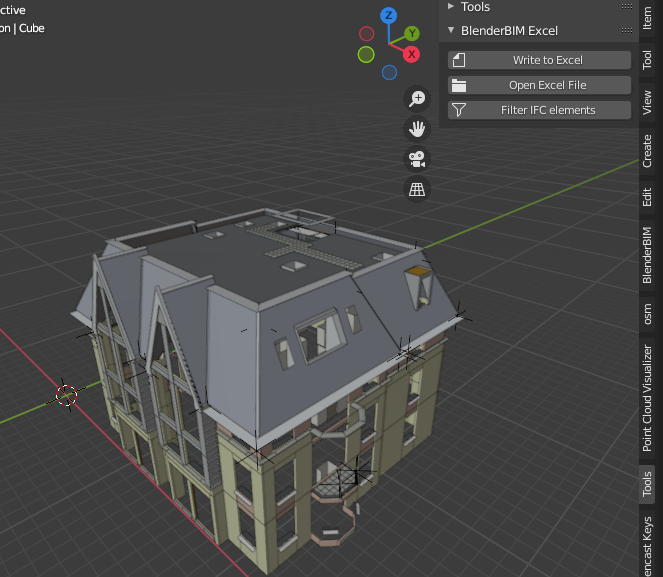
Managed to get this far before deciding a Blender native interface would be a better idea
Would be appreciated. I am in lockdown anyway. Might better spent my time useful then watching Seinfeld on Netflix.
I am in the Netherlands, luckily the Netherlands has only one timezone. So that would be
UTC+01:00@Gorgious
Thank you for the very detailed explanation with the example scripts, mostly I have no patience to read documentation.
@Coen I'll write to you in the chat, how about tomorrow some time, I'm in Vienna so our timezones should match up nicely ;)
Yes, I would not advise you to pursue using QT or third party interfaces in Blender, running things out of the main Blender loop is barely supported and since it's an API you're bound to have desync errors if you don't manage carefully how you store & access your variables. You can however explore the
gpumodule which lets you draw custom things on the screen but that's quite advanced already.Blender's layout system is daunting at first but having used it extensively for some time, and tested other systems, I feel like it's one of the nicer and simpler interface APIs I've encountered overall. It's just that the documentation is all over the place. But at least you'll master another skill : Effective Google Search :)
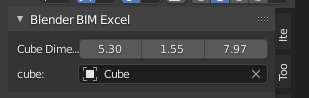
Still not very elegant yet, but the basics works. Starting to get there :-).
How would I update the UI when the user has an excel file opened? I want to list the excel file path after opening.
Here is my code so far
Found this post, but I am still confused
Have a look at the code from IFC CSV - I think it does exactly what you want. Essentially, after selecting a file, the filepath is saved to a string property: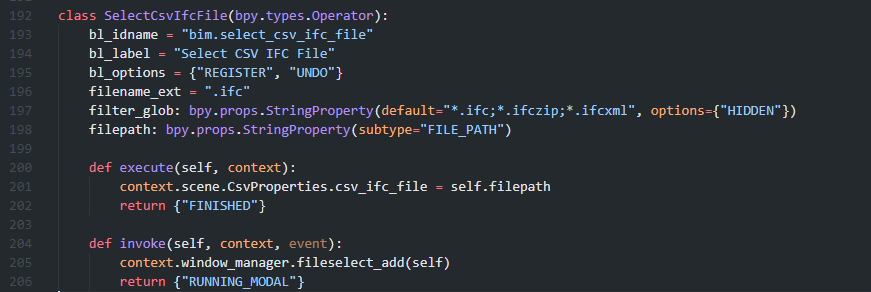

The filepath is then shown in the UI:
'
How does one bundle python dependencies in a Blender add-on?
Found this post
But when looking in the BlenderBIM add-on I think they do it differently and I think easier.?
Is there a possibility in Blender where you can 'freeze' the enviroment in which you developed so you can bundle the add-on with the dependencies?
Blenderbim bundles packages in the downloaded zip file (in libs/sites/packages). After all a python module is generally just a folder with python files that's installed in your python environment.
So you can do that and directly call it from your code like you would do any other submodule you created but on the other hand it's tricky because if the package has a critical update and you keep using an older version you risk introducing safety hazards in your addon.
You can also call
pipusing the command line directly in your script to ensure you get the latest version. Also if the package is heavy it has the added benefit of not bloating your add-on size. There are several alternatives which are described there https://blender.stackexchange.com/questions/5287/using-3rd-party-python-modulesI just have to add for completeness that requiring access to internet is against Blender's philosophy. I don't really have an opinion on that but some people might object on needing to download a third party python module in addition to your add-on.
@Gorgious
Yes, it works!
I used the method you posted on that thread.
What does
f"--target={py_exec[:-14]}"do exactly?IIRC It's a hack to get the module installed in the local blender installation lib folder, otherwise by default it installed the module in my global windows python environment which I don't like and Blender doesnt recognize by default.
I made some checkboxes in my add-on, but I am don't understand how to tell in the class if the checkbox is checked to run a specific function.