Yes, this is a lesser known but I believe will become the most important features when authoring in the future.
Enabling the BIM tool will let you pick from available types in your project. This is similar to Revit's "Insert Component" feature, where you can pick a class, and then a type within that class. When you have a class selected, it enables a series of context-sensitive operations and hotkeys related to that class. E.g. for walls, you immediately get wall joining, flipping, aligning, openings, etc. For Slabs, you get openings. Naturally, for non-architectural users, they will see things like pipes, structural operations, etc, all of which will be optimised for their needs.
This is a fundamental solution to the issue of the saturation of both UI and hotkeys in Blender land. Naturally, we don't want 15 ribbons and buttons galore for the 200 types of IFC classes. Also, all of the primary non-modal hotkeys and most of the modal hotkeys are already saturated with generic modeling operations, which is what Blender was designed for. Introducing a BIM mode which toggles this authoring context is my solution to allow all disciplines, not just architectural, to easily insert objects that are relevant to them easily, as well as access necessary tools using hotkeys for rapid authoring.
For those who want to play with it, I've attached a simple project library which you can append some types from to easily get started from a fresh project. I plan to start distributing these simple asset libraries so that within seconds, much like mature BIM programs, you can start authoring.
For now, you will only see special capabilities for walls, slabs, columns, beams, and members. I'm slowly working my way through more element types, and currently working on openings. So if you're wondering why it still takes 10 clicks and is a pain to insert a door, that's because I haven't gotten around to it yet.
@Moult said:
For those who want to play with it, I've attached a simple project library which you can append some types from to easily get started from a fresh project. I plan to start distributing these simple asset libraries so that within seconds, much like mature BIM programs, you can start authoring.
Awesome. Possible to create a repo at https://gitlab.com/osarch for these libraries?
I'd like to contribute to an imperial library as well.
@Moult is the library defined per-file? or can you have multiple libraries in an IFC file? (asking for a friend). I see that the DEMO100 wall type appears in the GUI even though it hasn't been added to the IfcProjectLibrary.
@theoryshaw if you have figured-out how all this works (manipulating IFC models through the GUI), I'd dearly love to see a screencast of it in action.
@Moult I have a question about walls, but I think I know the answer. The wall trimming/joining code seems to assume that all walls extend along the local X-axis. The walls I'm creating have Body and Axis representations, but these are in world coordinates, so when they get extended in the X-direction it all goes a bit weird. Am I doing it wrong? should I be defining walls/openings/windows/clipping aligned with the X-axis and then rotating their placement?
@brunopostle, here's a video on loading a project library and inserting the type instances.
video: https://www.dropbox.com/s/x4h8eudwehm806d/2021-07-25_11-38-30.mp4?dl=0
After loading, you'll see me drag and massage the width of the properties window. Seems a weird bug, where the project library doesn't show up, unless you do that.
Let me know if were looking for screencasts of something different.
@theoryshaw Thanks, and music too! The bit I was missing was clicking on the paperclip to transfer the wall type from the library file into the blender project.
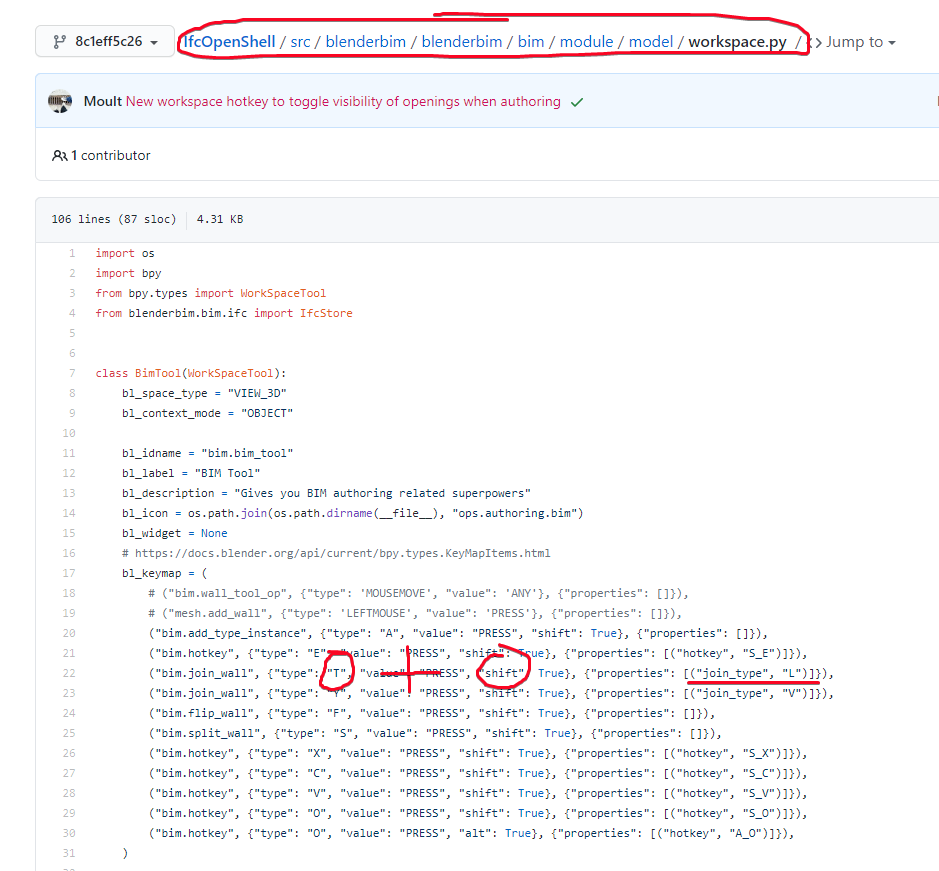
For anyone else who wants to try, the sequence is: create an Ifc Project, load the Ifc Project Library, pick the 'type' you want from the library and 'append' to the current project using the little paperclip. Then in the BlenderBIM sidebar, you can select the 'type' you already appended, add an 'instance' and the wall/column/beam appears in the model (alternatively, click the green cube icon and a toolbar appears that enables hotkeys).
Thanks for the Video! My project units are set to mm(because I prefer to work in mm) so I was wondering why my project walls were paper thin hahhaha, this helped me out!
Headsup for anyone else who changes blenders default settings
@brunopostle said: @Moult I have a question about walls, but I think I know the answer. The wall trimming/joining code seems to assume that all walls extend along the local X-axis. The walls I'm creating have Body and Axis representations, but these are in world coordinates, so when they get extended in the X-direction it all goes a bit weird. Am I doing it wrong? should I be defining walls/openings/windows/clipping aligned with the X-axis and then rotating their placement?
Answering my own question: the blenderbim wall trimming/extending more-or-less works when the walls are defined parallel to the positive X-axis before placement. Here are some (non-orthogonal) Homemaker add-on walls moved and then trimmed:
Yes, I've tried to keep the requirements as simple as possible - local X axis is the main requirement. I've also started making it increasingly intelligent with the ability to shift openings as well and other decomposed things (like wall projections).
@brunopostle sort of, assuming the wall is prismatic, you always have the option of making it a 2D extruded profile. In fact, the BlenderBIM Add-on dumb walls (marked with EPset_Parametric.Engine=BlenderBIM.DumbWall) will always cast to a 2D extruded profile even if you're pushing around vertices manually.
@Moult I have some walls, e.g. gables, that are extruded vertically as usual, but half-space clipped along the top to meet the roof. These go a little bit weird. I don't think this is a priority, half-space clipping is an obscure IFC feature.
Ah yes I haven't yet built roof clipping support. However, roof clipping is no different than any other opening that voids it, so in the latest builds, there are feature to toggle openings, and toggling edit mode will auto make openings dynamic, and alt-d will toggle parenting of decompositions - it's a step in the right direction to let you edit them and preserve the profile.


Comments
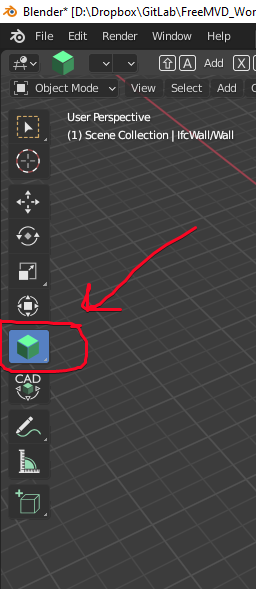
In left (tools) panel of 3d view, you should find a 3d cube icon, basically enabling a mode where shortcuts are available.
Bingo! Thanks @stephen_l
For others working their way through...
Yes, this is a lesser known but I believe will become the most important features when authoring in the future.
Enabling the BIM tool will let you pick from available types in your project. This is similar to Revit's "Insert Component" feature, where you can pick a class, and then a type within that class. When you have a class selected, it enables a series of context-sensitive operations and hotkeys related to that class. E.g. for walls, you immediately get wall joining, flipping, aligning, openings, etc. For Slabs, you get openings. Naturally, for non-architectural users, they will see things like pipes, structural operations, etc, all of which will be optimised for their needs.
This is a fundamental solution to the issue of the saturation of both UI and hotkeys in Blender land. Naturally, we don't want 15 ribbons and buttons galore for the 200 types of IFC classes. Also, all of the primary non-modal hotkeys and most of the modal hotkeys are already saturated with generic modeling operations, which is what Blender was designed for. Introducing a BIM mode which toggles this authoring context is my solution to allow all disciplines, not just architectural, to easily insert objects that are relevant to them easily, as well as access necessary tools using hotkeys for rapid authoring.
For those who want to play with it, I've attached a simple project library which you can append some types from to easily get started from a fresh project. I plan to start distributing these simple asset libraries so that within seconds, much like mature BIM programs, you can start authoring.
For now, you will only see special capabilities for walls, slabs, columns, beams, and members. I'm slowly working my way through more element types, and currently working on openings. So if you're wondering why it still takes 10 clicks and is a pain to insert a door, that's because I haven't gotten around to it yet.
Awesome. Possible to create a repo at https://gitlab.com/osarch for these libraries?
I'd like to contribute to an imperial library as well.
@Moult is the library defined per-file? or can you have multiple libraries in an IFC file? (asking for a friend). I see that the DEMO100 wall type appears in the GUI even though it hasn't been added to the IfcProjectLibrary.
@theoryshaw if you have figured-out how all this works (manipulating IFC models through the GUI), I'd dearly love to see a screencast of it in action.
@Moult I have a question about walls, but I think I know the answer. The wall trimming/joining code seems to assume that all walls extend along the local X-axis. The walls I'm creating have Body and Axis representations, but these are in world coordinates, so when they get extended in the X-direction it all goes a bit weird. Am I doing it wrong? should I be defining walls/openings/windows/clipping aligned with the X-axis and then rotating their placement?
@brunopostle, here's a video on loading a project library and inserting the type instances.
video: https://www.dropbox.com/s/x4h8eudwehm806d/2021-07-25_11-38-30.mp4?dl=0
After loading, you'll see me drag and massage the width of the properties window. Seems a weird bug, where the project library doesn't show up, unless you do that.
Let me know if were looking for screencasts of something different.
@theoryshaw Thanks, and music too! The bit I was missing was clicking on the paperclip to transfer the wall type from the library file into the blender project.
For anyone else who wants to try, the sequence is: create an Ifc Project, load the Ifc Project Library, pick the 'type' you want from the library and 'append' to the current project using the little paperclip. Then in the BlenderBIM sidebar, you can select the 'type' you already appended, add an 'instance' and the wall/column/beam appears in the model (alternatively, click the green cube icon and a toolbar appears that enables hotkeys).
Thanks for the Video! My project units are set to mm(because I prefer to work in mm) so I was wondering why my project walls were paper thin hahhaha, this helped me out!
Headsup for anyone else who changes blenders default settings
Appending assets with different units is still undefined behaviour unfortunately, but we'll get there...
Just kinda scroll or wiggle your mouse around the area to trigger a refresh after loading a library. Haven't yet figured out a better way :(
@Moult It's still very intuitive right now though especially with the hotkeys, don't stress about it it's a very down the road nice to have.
Answering my own question: the blenderbim wall trimming/extending more-or-less works when the walls are defined parallel to the positive X-axis before placement. Here are some (non-orthogonal) Homemaker add-on walls moved and then trimmed:
Yes, I've tried to keep the requirements as simple as possible - local X axis is the main requirement. I've also started making it increasingly intelligent with the ability to shift openings as well and other decomposed things (like wall projections).
@Moult It seems to trim the final 3D geometry of the wall rather than the 2D profile of an extruded wall, is that right?
@brunopostle sort of, assuming the wall is prismatic, you always have the option of making it a 2D extruded profile. In fact, the BlenderBIM Add-on dumb walls (marked with EPset_Parametric.Engine=BlenderBIM.DumbWall) will always cast to a 2D extruded profile even if you're pushing around vertices manually.
@Moult I have some walls, e.g. gables, that are extruded vertically as usual, but half-space clipped along the top to meet the roof. These go a little bit weird. I don't think this is a priority, half-space clipping is an obscure IFC feature.
Ah yes I haven't yet built roof clipping support. However, roof clipping is no different than any other opening that voids it, so in the latest builds, there are feature to toggle openings, and toggling edit mode will auto make openings dynamic, and alt-d will toggle parenting of decompositions - it's a step in the right direction to let you edit them and preserve the profile.