@cvillagrasa said:
Yet another priceless tutorial!! ??
Dankie!
question: how do you do it to have millimeters as length unit selected by default?
It's just that way from setting it and saving the file as the default file, it saves Blender setting (like the layout) and also BlenderBim settings (like your units and which template you have selected on startup
Great @Ace ! Thanks for the tutorial again. Just a few questions about walls;
1) I've seen in the latest update that you can now set de dimensions of the wall before creating it. That's great.
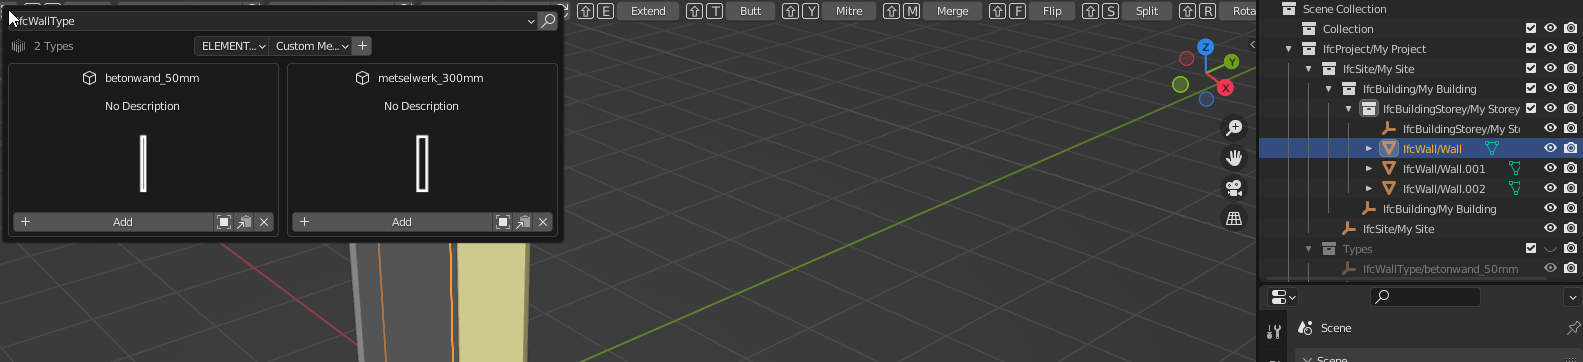
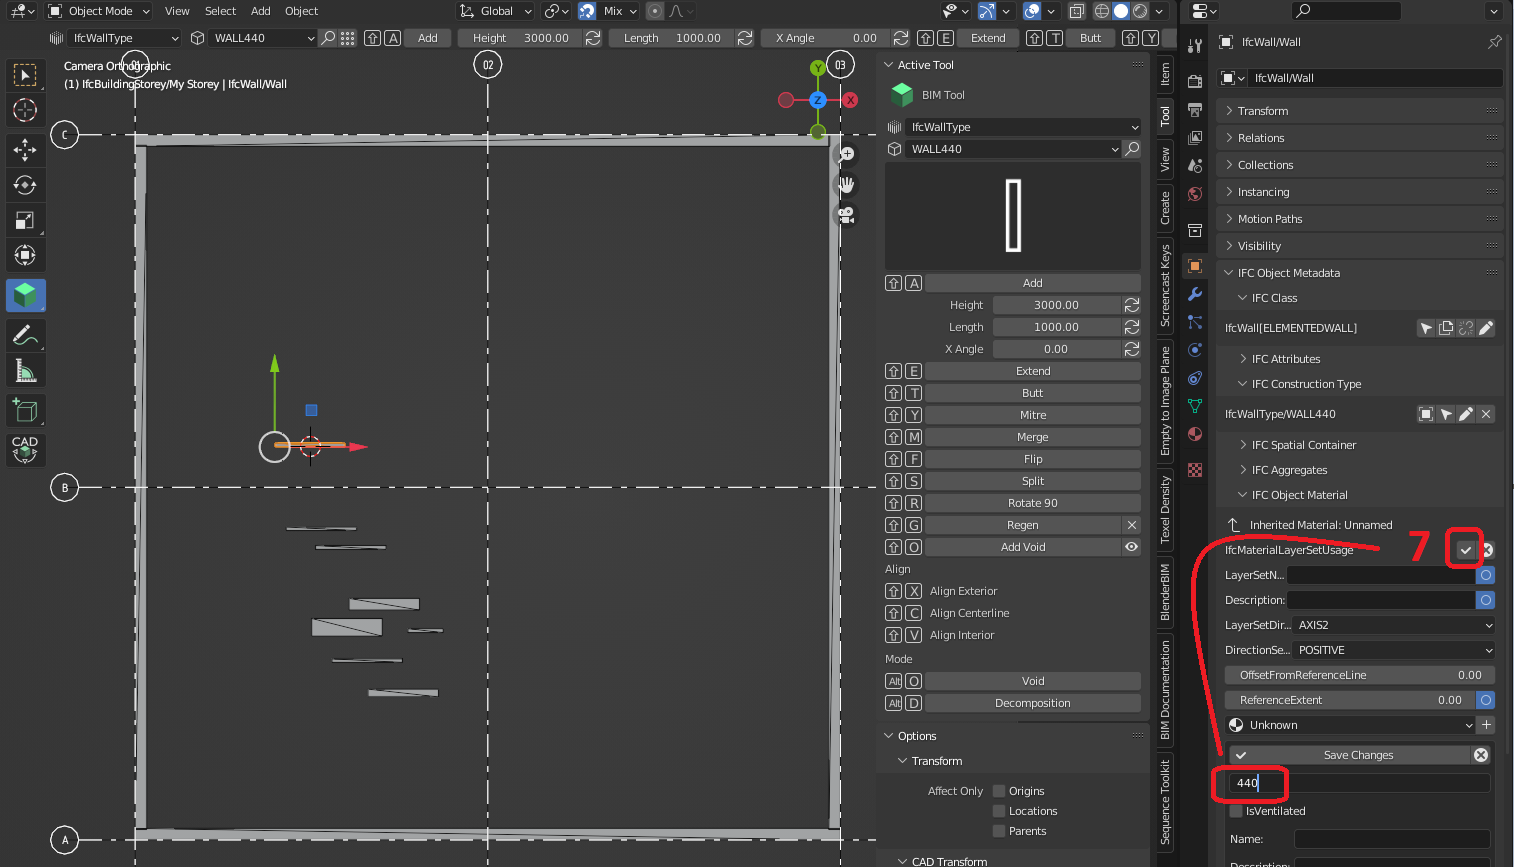
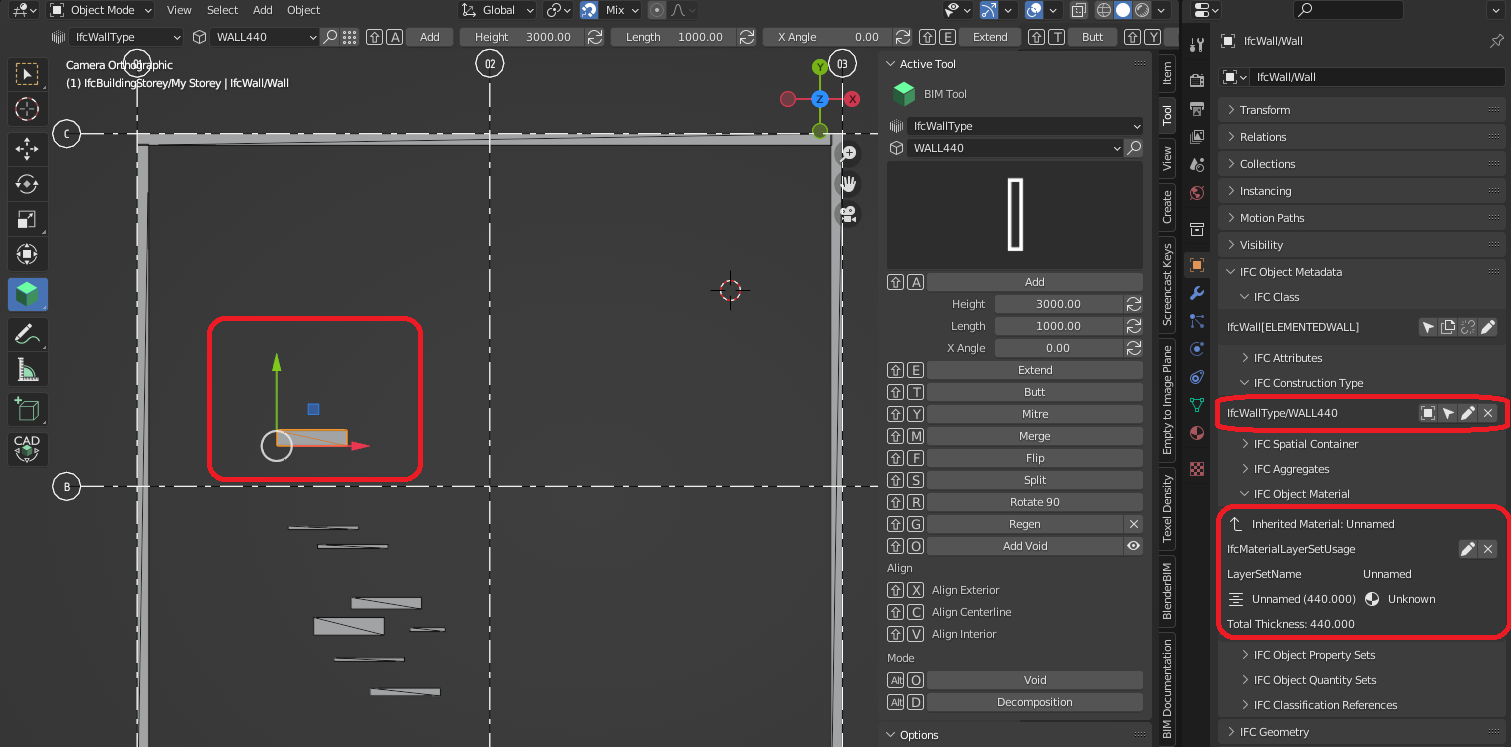
2) I assume that if you make a WallType with more than one layer there's no visible geometry related to this layer. The wall thickness is allways the sum of all layer thicknesses. Am I right?
3) Can you make a walltype directly from the model file, and not doing a library?
Thanks
@vbertran said:
Great @Ace ! Thanks for the tutorial again. Just a few questions about walls;
Hey Vbertran
1) I've seen in the latest update that you can now set de dimensions of the wall before creating it. That's great.
Yes! it technically was available before but not so apparent
2) I assume that if you make a WallType with more than one layer there's no visible geometry related to this layer. The wall thickness is always the sum of all layer thicknesses. Am I right?
At the moment that is also how I understand it, I've been experimenting to try get cavity walls with no visual luck so far, Once I know you will know, but it's certainly possible
3) Can you make a walltype directly from the model file, and not doing a library?
You totally can, it is just incredibly easy to mess up the naming and also accidently overlap it with a pre-existing wall type etc. So for the purposes of the tutorial I've just done a single wall in it's own file
At the moment that is also how I understand it, I've been experimenting to try get cavity walls with no visual luck so far, Once I know you will know, but it's certainly possible
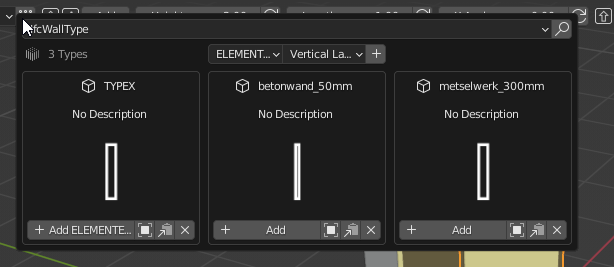
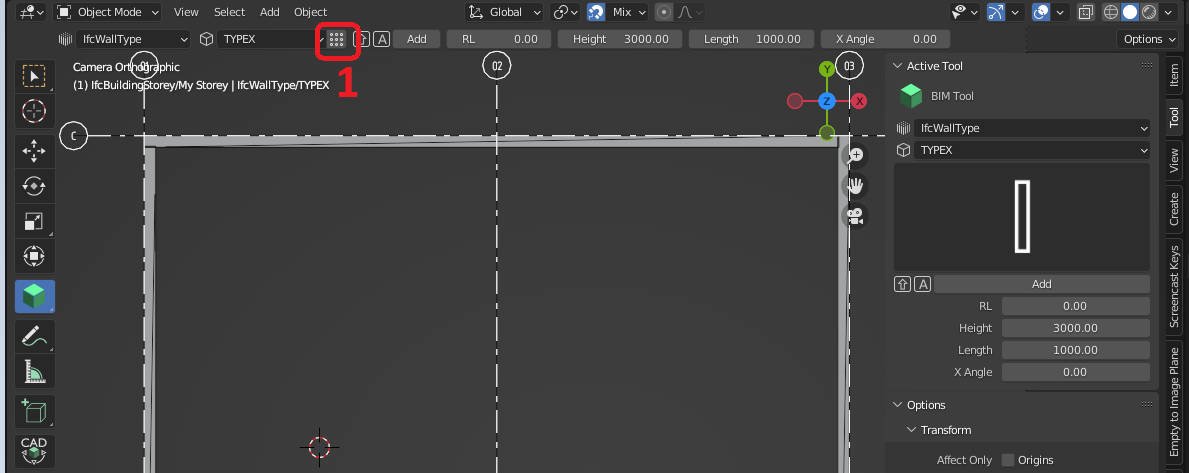
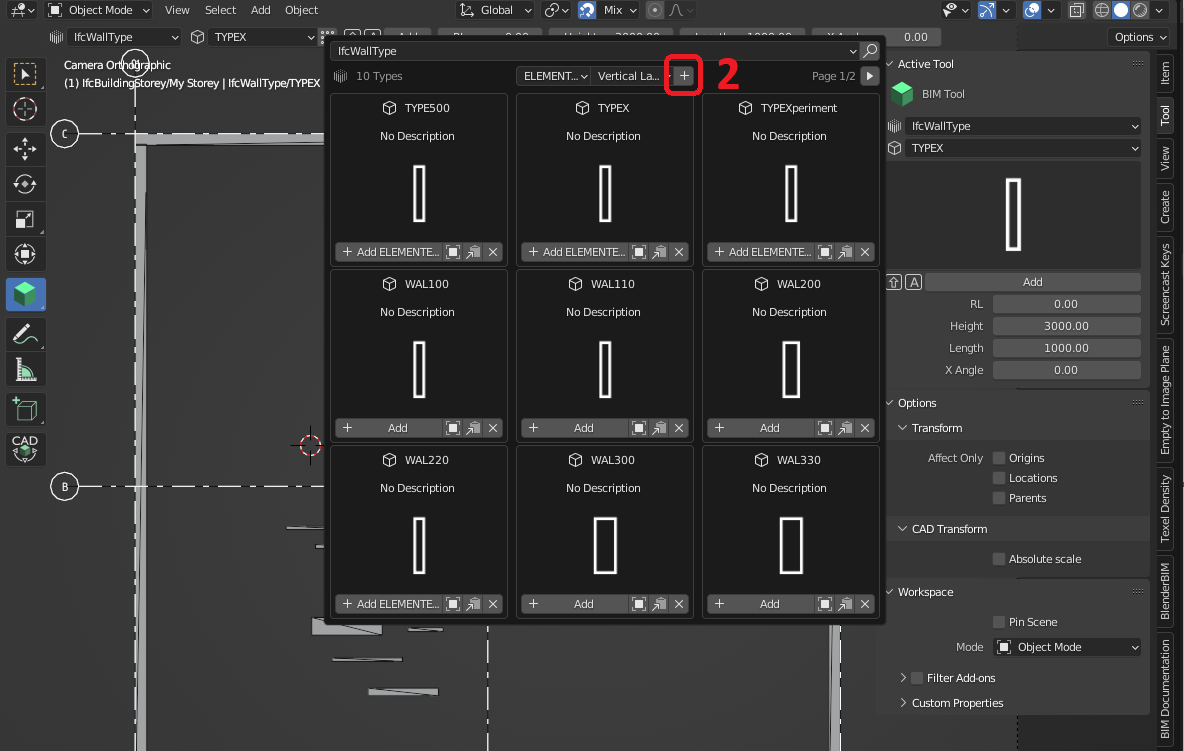
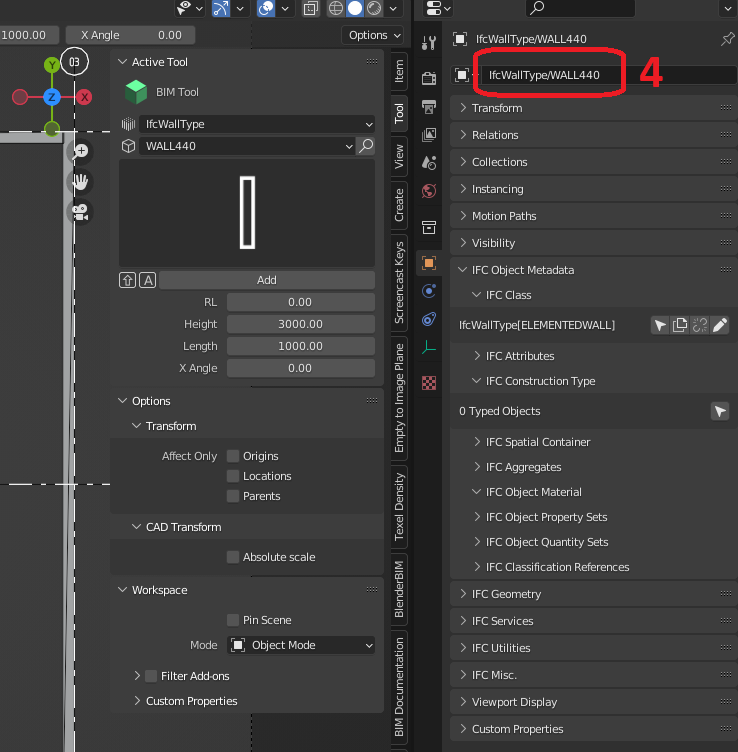
There's been a new addition in the BIM Tool > Launch Type Manager where you can manage types, you can also add new types. You can choose between adding a new type based on a custom mesh, etc ... one of those options is "Vertical Layers" - this is a one click way which creates an empty, assigns a material layer set, and assigns a single layer out of the box and also refreshes the thumbnails, so hopefully the workflow is much smoother. Once it's created, you can click the "Activate Object" icon in the type manager and edit its name / thickness / etc.
There's been a new addition in the BIM Tool > Launch Type Manager where you can manage types, you can also add new types. You can choose between adding a new type based on a custom mesh, etc ... one of those options is "Vertical Layers" - this is a one click way which creates an empty, assigns a material layer set, and assigns a single layer out of the box and also refreshes the thumbnails, so hopefully the workflow is much smoother. Once it's created, you can click the "Activate Object" icon in the type manager and edit its name / thickness / etc.
@Moult
Nice! Now it only takes two cliks to create a new IfcWallType
What's the reason for the name of the meshes not inheriting the name of the IfcWallType in the Scene Collection? They are all called IfcWall/Wall
This whole tutorial video could be done in 10 seconds now hahhaha
I'm being a bit stupid because I cant seem to find the "Activate Object" icon, but this is working great!
But looking at @Coen 's try
Step 1: Select the Type Manager
Step 2: Add the elemented wall / Vertical Layer
Step 3: Select the new walltype X
Step 4: Rename the wall type
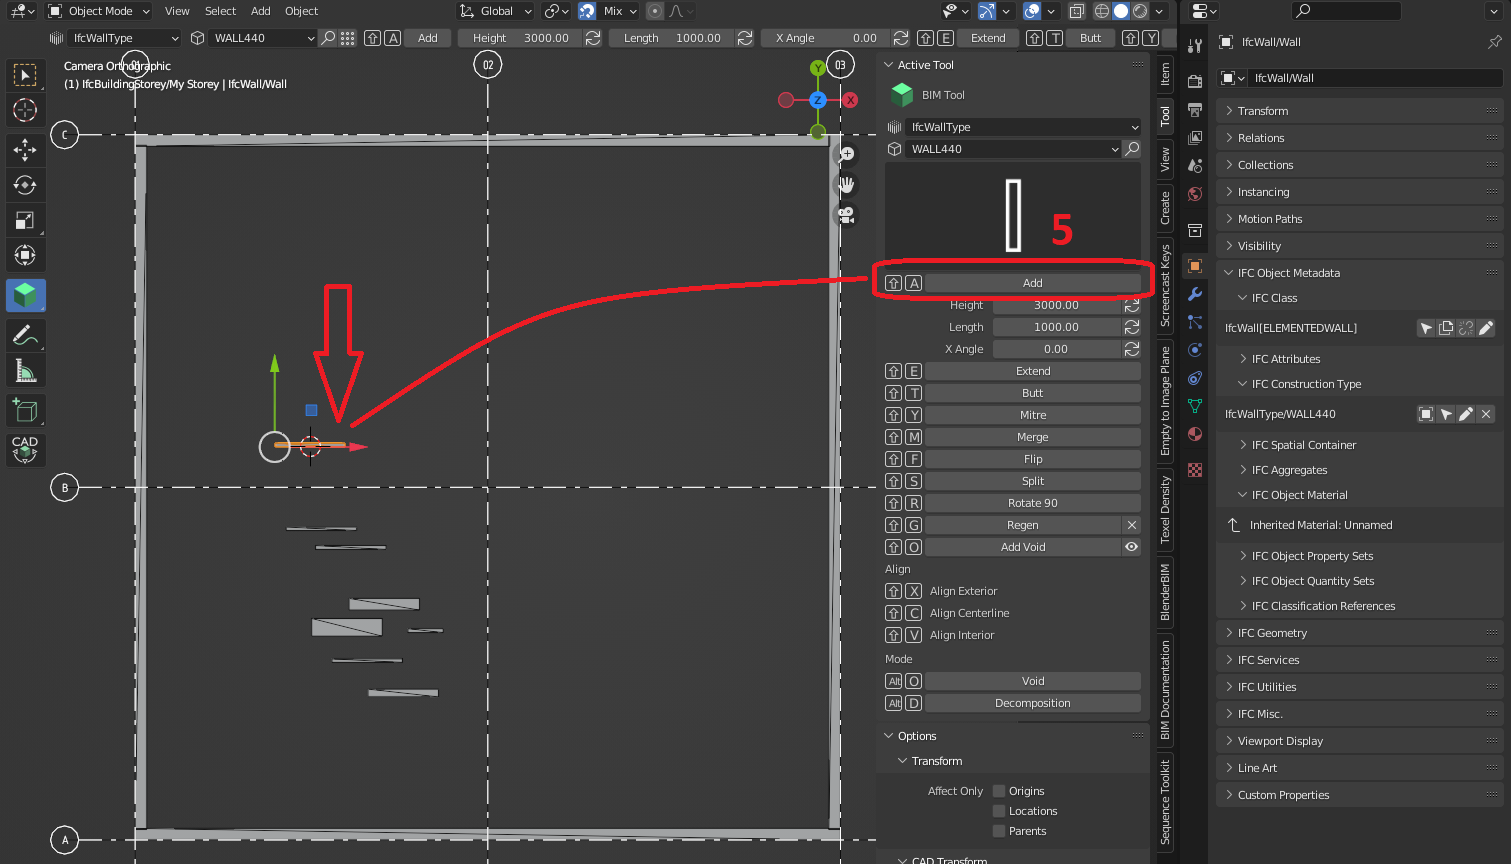
Step 5: Add the wall into the project "shift-A"
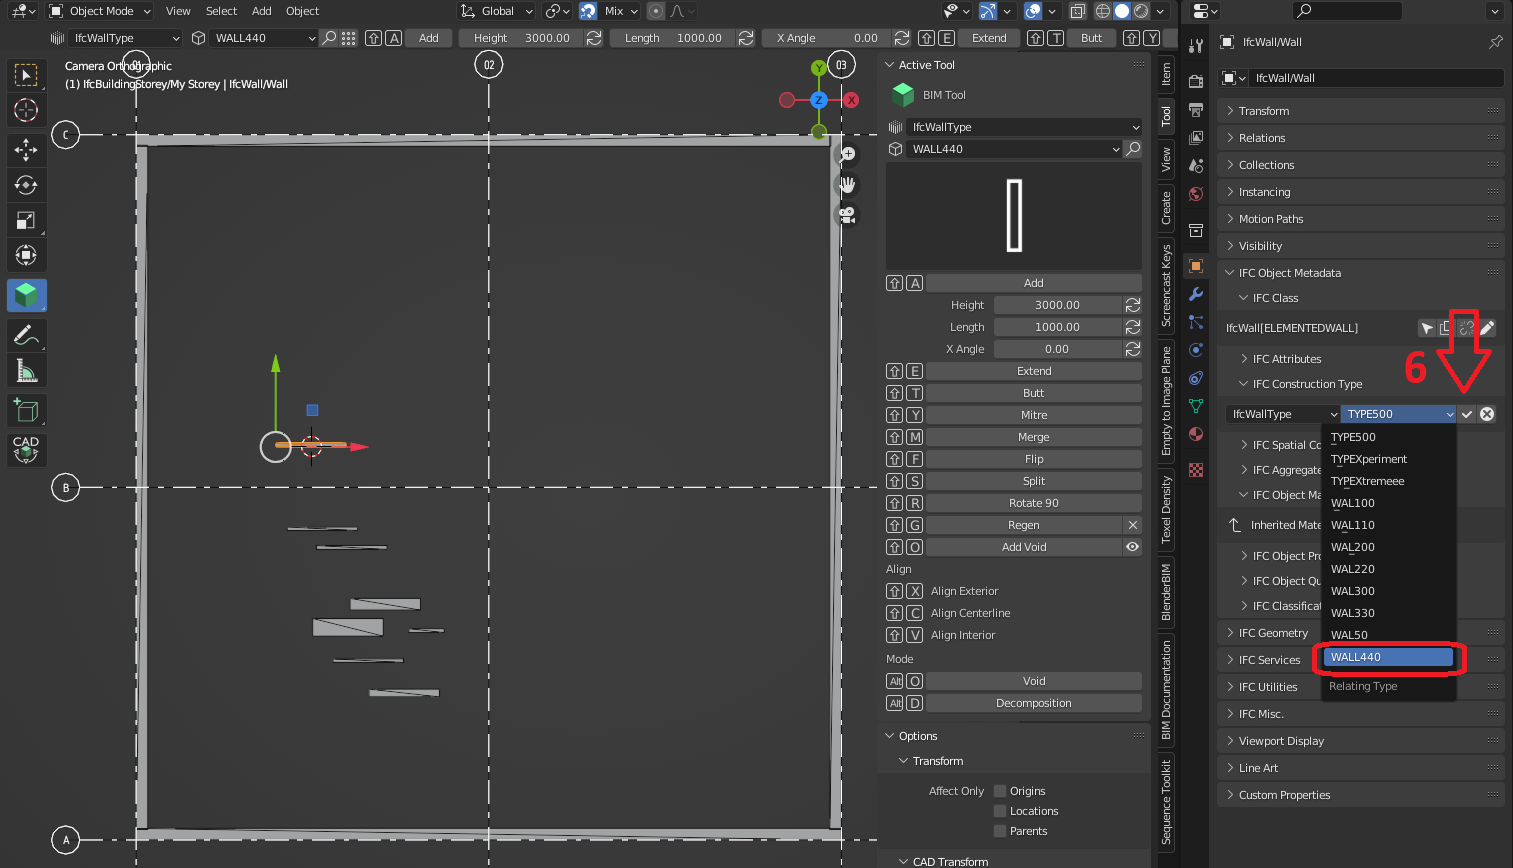
Step 6: Reselect the IfcConstruction type to load the material layerset
Step7: Edit the thickness
@Coen said:
Sorry for being offtopic of the tutorial, but it's is possible to select one Grid and use the IFC array modifier to place grids?
Not yet, since grid axes are not rooted.
@Ace said:
This whole tutorial video could be done in 10 seconds now hahhaha
It is because you created your earlier tutorials and because @cvillagrasa created the thumbnail browser that I realised I needed to streamline certain things.
But nowhere it's explained how to add a drawing to a sheet, print the sheet, or change the hatch pattern of an IfcWall.
Would this be an idea for a next video?
I have no idea what i'm doing
1) How to place drawings on sheet accurately? I guess it's kind of the same approach as Revit with Viewports?
2) How to change hatch patterns?
3) How would I add my own logo to the sheet or adjust the sheet?
4) How do I move all the drawing on the sheet to make a nice sheet layout?
I've think I've seen many posts about this on this forum, but lost track on where it all is
@Coen said:
But nowhere it's explained how to add a drawing to a sheet, print the sheet, or change the hatch pattern of an IfcWall.
Would this be an idea for a next video?
You got it, I just didn't want it too take too long (20mins), otherwise it would seem a bit daunting, so that stuff is in the next one
You kinda do hahha, I will have a video of it next week wednesday it's ganna be a bit long, but here is the process so far
1) How to place drawings on sheet accurately? I guess it's kind of the same approach as Revit with Viewports?
Not at all, as it is currently you need to adjust the sheets completely in inkscape (not illustrator, it didnt work well for me)
2) How to change hatch patterns?
You do it by relabeling the material, by default it is 'unknown' change that to 'brick' and voila! You can also add and make your own materials by editing the CSS document, which is very cool and easy
3) How would I add my own logo to the sheet or adjust the sheet?
It's done in inkscape at present which works quite well imo, my process was to take a pdf of our titleblock from autocad, save it as an svg and then copy it to the 'templates' folder / 'titleblocks' in Blender Bim
4) How do I move all the drawing on the sheet to make a nice sheet layout?
Done in Inkscape
I've think I've seen many posts about this on this forum, but lost track on where it all is
Likewise, even stuff I have told people what to do I cant remember, one of the reasons I am making videos, for self reference
So most of the process you see will be a bit of an inkscape tutorial aswell


Comments
Yet another priceless tutorial!! ??
question: how do you do it to have millimeters as length unit selected by default?
Dankie!
It's just that way from setting it and saving the file as the default file, it saves Blender setting (like the layout) and also BlenderBim settings (like your units and which template you have selected on startup
Great @Ace ! Thanks for the tutorial again. Just a few questions about walls;
1) I've seen in the latest update that you can now set de dimensions of the wall before creating it. That's great.
2) I assume that if you make a WallType with more than one layer there's no visible geometry related to this layer. The wall thickness is allways the sum of all layer thicknesses. Am I right?
3) Can you make a walltype directly from the model file, and not doing a library?
Thanks
Hey Vbertran
Yes! it technically was available before but not so apparent
At the moment that is also how I understand it, I've been experimenting to try get cavity walls with no visual luck so far, Once I know you will know, but it's certainly possible
You totally can, it is just incredibly easy to mess up the naming and also accidently overlap it with a pre-existing wall type etc. So for the purposes of the tutorial I've just done a single wall in it's own file
Welcome
@Ace
FYI
https://github.com/IfcOpenShell/IfcOpenShell/issues/1227
Awesome tutorial yet again!
There's been a new addition in the BIM Tool > Launch Type Manager where you can manage types, you can also add new types. You can choose between adding a new type based on a custom mesh, etc ... one of those options is "Vertical Layers" - this is a one click way which creates an empty, assigns a material layer set, and assigns a single layer out of the box and also refreshes the thumbnails, so hopefully the workflow is much smoother. Once it's created, you can click the "Activate Object" icon in the type manager and edit its name / thickness / etc.
That sounds amazing Moult!
@Moult
Nice! Now it only takes two cliks to create a new IfcWallType
What's the reason for the name of the meshes not inheriting the name of the IfcWallType in the Scene Collection? They are all called IfcWall/Wall
Configure the "Occurrence Name Style" in the add-on preferences.
A really nice video! For Revit, I learned a lot from this kind of videos.
Also, for those of you who aren't afraid of French and of the current bugs in IFC.js, I've posted the first few BlenderBIM chapters of the Villa Le Sextant tutorial here : https://enac-cnpa.github.io/BlenderBIM-Tutoriel-Villa-Le-Sextant/5_modelisation-ifc.html
@RaphaëlVouilloz
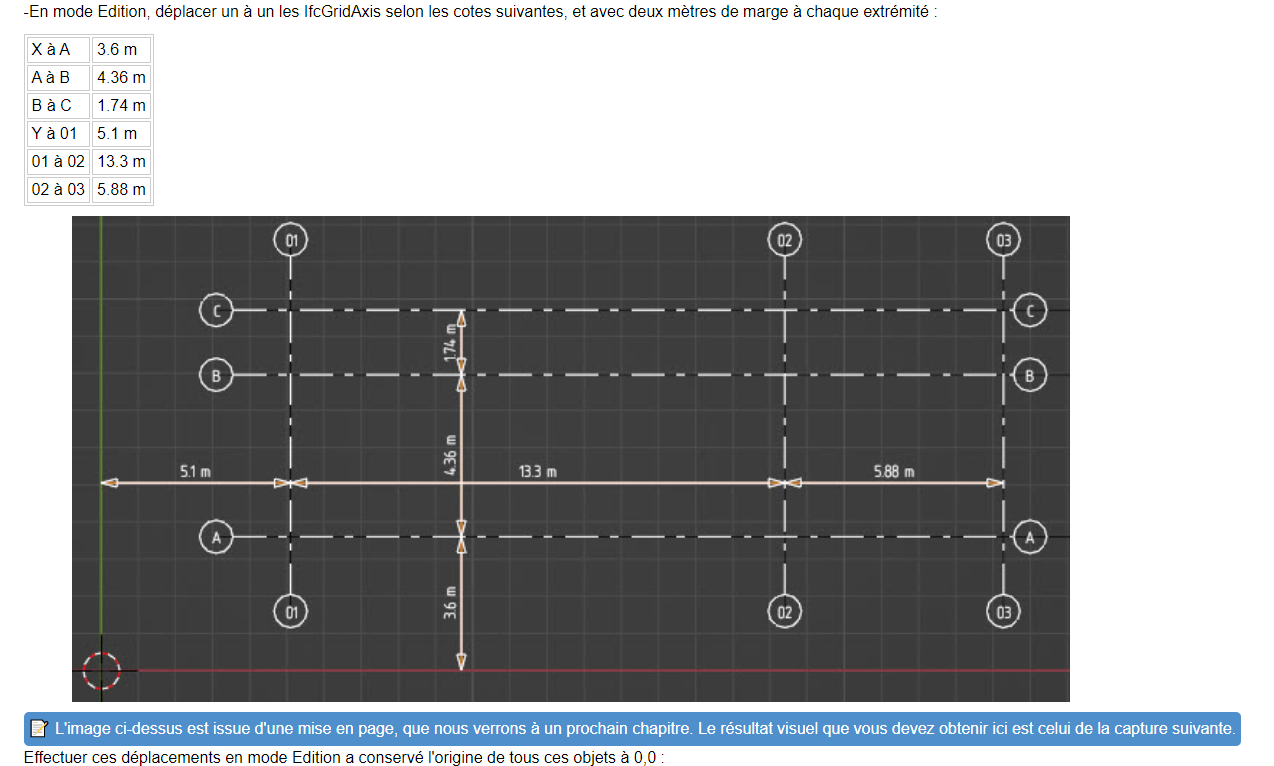
Nice tutorial, did you preset the IfcGrid from the values in that table? How did you do that?
?
This was always my biggest fear in high school
Thanks Coen! No presets, I just moved them in Edit Mode.
Also on Chrome you can translate in one click :)
Sorry for being offtopic of the tutorial, but it's is possible to select one Grid and use the IFC array modifier to place grids?
a great question! it seems no ahah
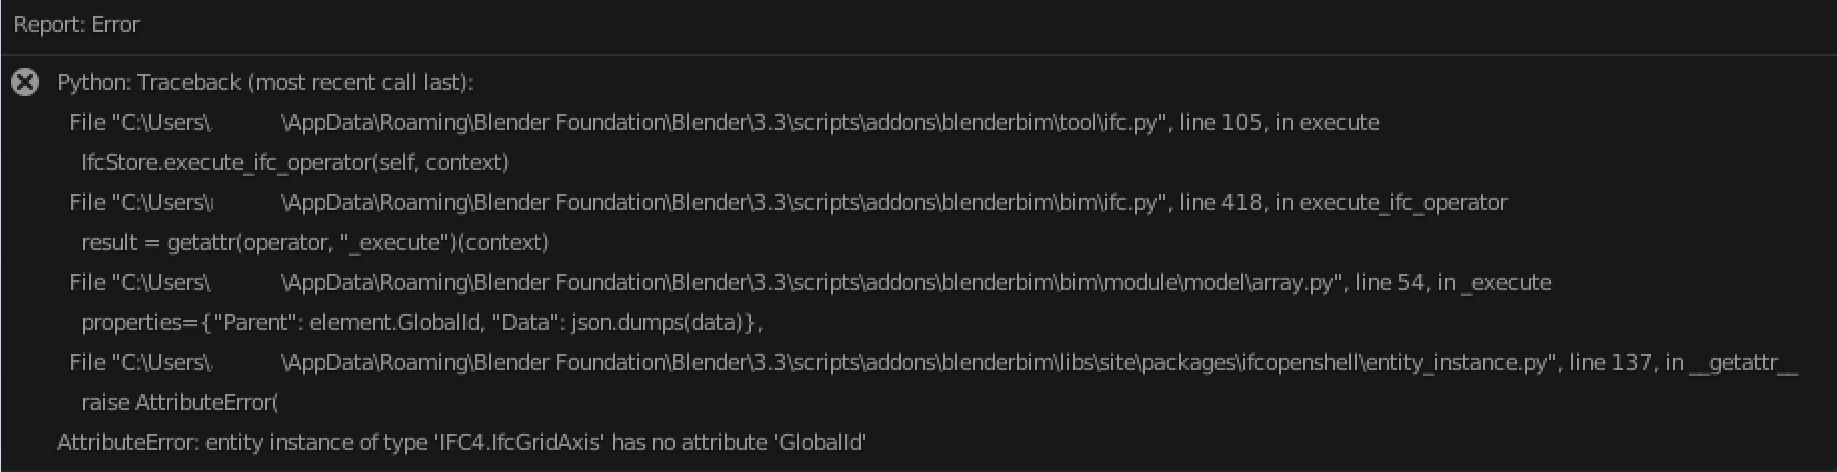
It would be cool if it did though
This whole tutorial video could be done in 10 seconds now hahhaha
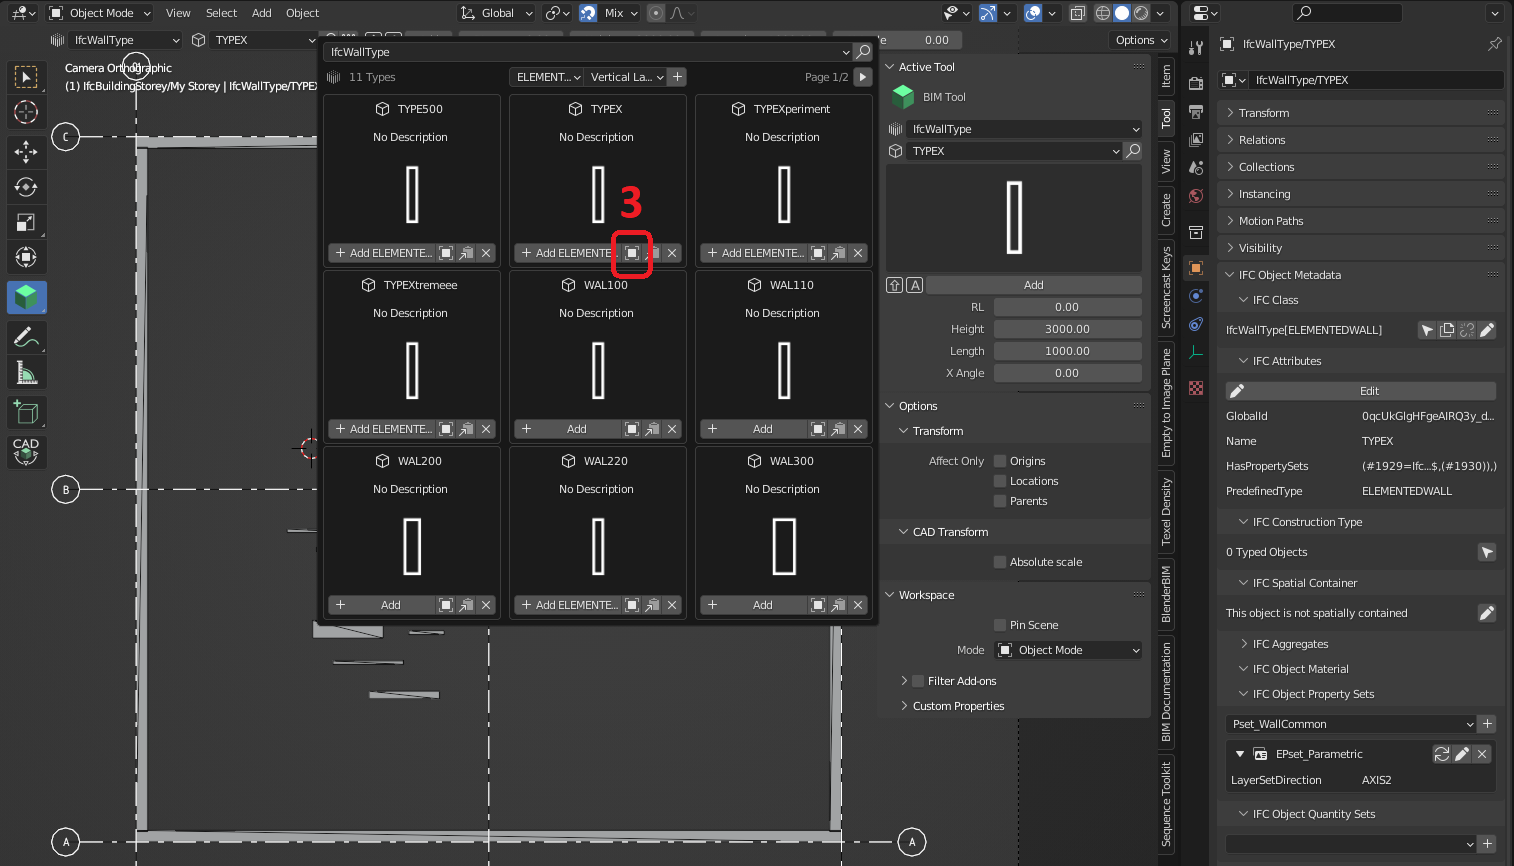
I'm being a bit stupid because I cant seem to find the "Activate Object" icon, but this is working great!
But looking at @Coen 's try
Step 1: Select the Type Manager
Step 2: Add the elemented wall / Vertical Layer
Step 3: Select the new walltype X
Step 4: Rename the wall type
Step 5: Add the wall into the project "shift-A"
Step 6: Reselect the IfcConstruction type to load the material layerset
Step7: Edit the thickness
We are now the proud owner of a new wall:
This is flipping great!
Not yet, since grid axes are not rooted.
It is because you created your earlier tutorials and because @cvillagrasa created the thumbnail browser that I realised I needed to streamline certain things.
I watched this very nice clip in it's entirity
But nowhere it's explained how to add a drawing to a sheet, print the sheet, or change the hatch pattern of an IfcWall.
Would this be an idea for a next video?
I have no idea what i'm doing

1) How to place drawings on sheet accurately? I guess it's kind of the same approach as Revit with Viewports?
2) How to change hatch patterns?
3) How would I add my own logo to the sheet or adjust the sheet?
4) How do I move all the drawing on the sheet to make a nice sheet layout?
I've think I've seen many posts about this on this forum, but lost track on where it all is
You got it, I just didn't want it too take too long (20mins), otherwise it would seem a bit daunting, so that stuff is in the next one
You kinda do hahha, I will have a video of it next week wednesday it's ganna be a bit long, but here is the process so far
Not at all, as it is currently you need to adjust the sheets completely in inkscape (not illustrator, it didnt work well for me)
You do it by relabeling the material, by default it is 'unknown' change that to 'brick' and voila! You can also add and make your own materials by editing the CSS document, which is very cool and easy
It's done in inkscape at present which works quite well imo, my process was to take a pdf of our titleblock from autocad, save it as an svg and then copy it to the 'templates' folder / 'titleblocks' in Blender Bim
Done in Inkscape
Likewise, even stuff I have told people what to do I cant remember, one of the reasons I am making videos, for self reference
So most of the process you see will be a bit of an inkscape tutorial aswell
@Ace
Thanks! Looking forward to you next video! Will already download and install InkScape
related question on how to create walls with new UI: https://matrix.to/#/!ssOmSJysZpXBupsgjO:matrix.org/$qmOV4m1eK5exzQea1qfj1pen4lGIO4uTvyk57wMA28s?via=libera.chat&via=matrix.org&via=nitro.chat