

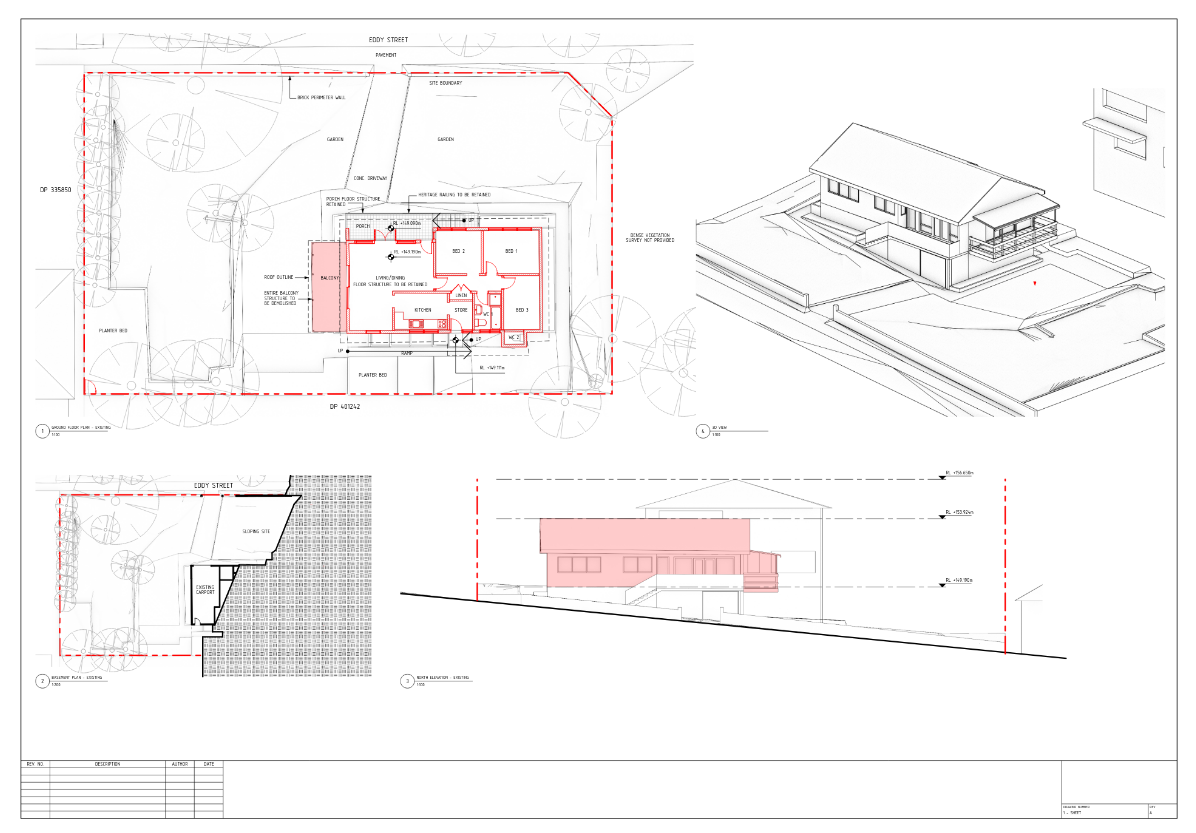
Demonstration of BlenderBIM Add-on used to produce house alteration drawings

@globalcitizen has got a house that he plans to knock down most of it and build a new 2 storey house in its place. This involves submitting some council applications describing the extent of demolition, and a new design. He has kindly volunteered the survey data to be used to produce some open source documentation.
This little documentation exercise serves as a technical demo, as well as a method to prioritise development on the add-on towards commercially useful output. You can find the repo here:
https://github.com/Moult/blenderbim-demo-house
It is licensed under CC-BY-SA 4.0. No warranty is provided with these drawings. These drawings are intended for a technical software demonstration only of the BlenderBIM Add-on software, and no claims are made on its suitability for construction. Anybody, including @globalcitizen, who decides to use these drawings with the intention to create any physical building construction, are doing so at their own risk and their own responsibility. If the building falls down, is not to code, or causes any physical damage, or if your cat dies, it's not my fault and you aren't allowed to sue me. I am not paid for this, nor will I ever expect any compensation. I am not a registered architect under Australian law, so don't treat these drawings as though they were created by a professional.
Phew, OK now that that's out of the way... pictures (the Git repo has PDFs)!
Things I demo:
- No 2D touch-up. Everything is produced directly from Blender and IFC. No post-production works in LibreCAD, Inkscape, etc. (Minor positioning of drawings on the sheet with Inkscape, though)
- All valid IFC representations: doors have doors swing PLAN representations.
- Cameras now support PLAN_VIEW / ELEVATION VIEW / etc, and apply different styles based on it
- Drawing styles, yes!
- All styling with CSS. All styling is semantic, if it's red, that's because it's based off an IFC property that states that it is demolished, it isn't arbitrarily red. Some exceptions on elevation views.
- Site boundary is a 3D object. Cool.
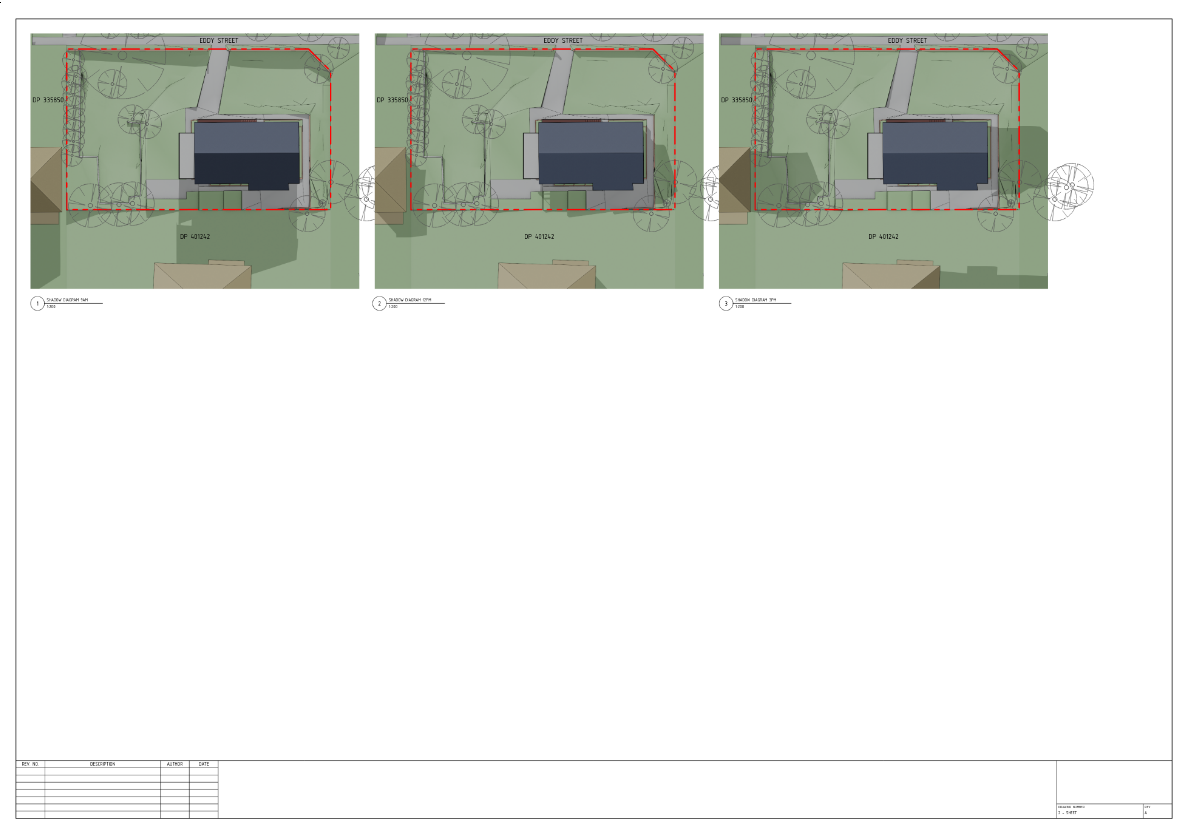
- Shadow analysis uses built-in sun position add-on.


 and 7 others.
Comments
Nice! In my country we represent what's going to be demolished in yellow and new construction in red. I notice you don't have the demolition there.
@JQL here red means demolished, solid black means existing, and new construction is white filled or hatched in the appropriate material hatch. So far, I have not modeled any of the existing vegetation, nor modeled any of the new construction. So it is very much a work in progress. It is pretty slow, as I keep on stopping to build new features or fix bugs that I encounter, but that's the point :)
This is awesome.. will be helpful in reversing engineering the logic behind things.
Per this issue, is it possible to put your data folder for this project in this repo as well?
Will provide further insight.
But would it be possible to have the demolished in yellow and the new in red, while black would be for what remains in place?
I'm pretty sure that's what Dion meanst when he says the styling is semantic. The redness is a CSS property of objects marked in the IFC as demolished. So changing the CSS could change all demolished from a red styling to any color you choose.
@JQL correct - the CSS defines the colours, so all stroke colours, dash patterns, hatch patterns, fill colours, opacity, etc is all user configurable.
CSS like in websites? That seems cool.
And do we have an UI for that or do we have to tinker with notepad?
@JQL for the moment, tinker with a text editor. Blender has one built-in, which helps. Examples and presets are provided.
The concept is perfect.
I could eventually figure it out, but that needs a lot of investment from my behalf I suppose it would be an important UI for the future.
This is nice, the disclaimer is classic, you did forget though to clarify that no animals were harmed in the making of the project. ;o)
Hope we get a work flow walk through during today's meetup, no matter how short, if time permits.
Have there been more examples of BlenderBIM produced drawings? I think a lot happened in a year time.
@Coen I am posting small examples here: https://github.com/IfcOpenShell/IfcOpenShell/issues/1153
@Moult Could you possibly share the CSS file for this project?
The source files have been cool but so much has changed it's hard to interpret how to do the same with the latest Blenderbim
Sorry I don't have the CSS files anymore. Yes, so much has changed!
@Moult no worries just thought it might help with understanding how to use CSS to tag status with a hatch
Does anyone know the CSS line that makes elements with the status "DEMOLISH" red?
This is what we use...
[class*="PsetCommon-StatusEXISTINGDEMOLISH"] { fill: url(#demolish); stroke: red; stroke-dasharray: 2, 1; }We've changed a couple in the default css file, that comes in the demo file:
https://gitlab.com/openingdesign/mineral_point_residence/-/blob/main/drawings/assets/default.css
Thank you for posting your example. It was very useful to poke around and see how you achieved this. I noticed that the CSS line above only seems to affect objects with the ifcWall class attribute. I also noticed in your project that the demolished doors have an ifcWall[ELEMENTEDWALL] class but also have a PSet_DoorCommon property set. Is there a way to correctly classify other demolished objects (like doors and sanitary fixtures), and also have them styled based on their status?
@tim well, status based styling currently does work on other types besides the wall but it doesn't work for 2d representations for now :\ I've created issue on github to track progress on this problem - https://github.com/IfcOpenShell/IfcOpenShell/issues/3330
To make it work with default BBIM door I've removed it's 2d representation from
Object Properties -> IFC Geometry -> IFC Representationssection.That's how it currenly works:
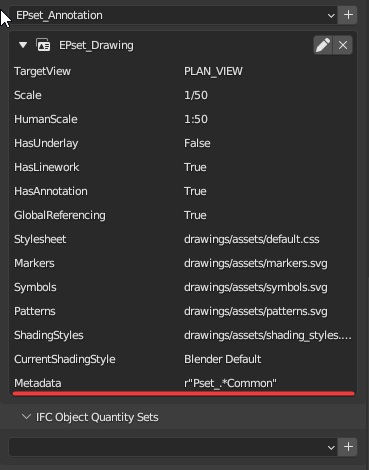
1) Need to make sure you have
r"Pset_.*Common"in drawing's psetEPsetDrawing.Metadata.This step is required so that all drawing's elements will have their status in the class allowing you to use it in CSS.
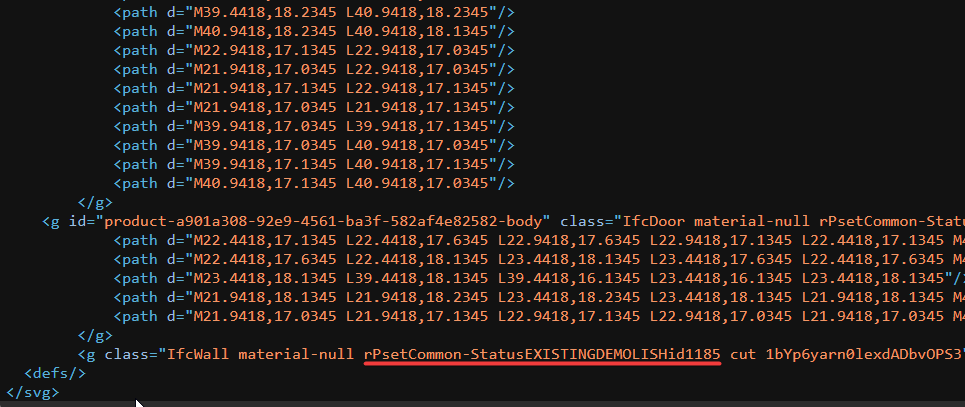
2) Add related css style to your project's
default.css. For example the code Ryan sent above will add demolish styling for all elements that have bothEXISTINGandDEMOLISHstatuses:[class*="PsetCommon-StatusEXISTINGDEMOLISH"] { fill: url(#demolish); stroke: red; stroke-width:0.15; stroke-dasharray: 2, 1; }3) Make sure status is set in PsetCommon.
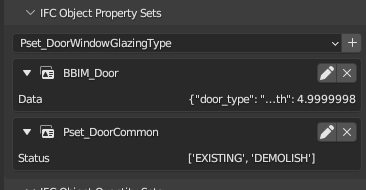
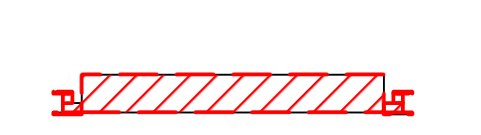
And then you'll have something like this on the print.
Just a little update because the syntax has been changed:
in metadata EPset_Drawing now the string to insert is this
/Pset_.*Common/.Status
in the default.css file specify this string
[class*="PsetCommonStatus-DEMOLISH"] { fill: url(#demolish); stroke: red; stroke-width:0.15; stroke-dasharray: 2, 1; }
Hey @Massimo, thanks for posting an update on this. I've tried following your update but I can't get it to work.
The process I followed was:
1. I added some walls and a door in a new demo project.
2. I added the corresponding Common Pset to each object and nominated each with a Status (DEMOLISH, EXISTING, NEW).
3. I added a plan view drawing
4. I pasted
/Pset_.*Common/.Statusinto the Metadata field of EPset_Drawing drawing view.5. I pasted
[class*="PsetCommonStatus-DEMOLISH"] { fill: url(#demolish); stroke: red; stroke-width:0.15; stroke-dasharray: 2, 1; }to the bottom of the default.css file.The drawing generates but does not show the walls that have been assigned the demolish status with the demolish pattern and a red dashed outline.
What am I doing wrong?
@tim hey, i opened your file and i found that last line of the default.css file was written wrong... so just update this line and it should work ...
I experienced, in the past, also problems with Inkscape so if doesn't show right in Inkscape, try to use a browser to visualize the .svg file (Edge, Chrome, Firefox, etc... )
Thanks @Massimo, after pasting your code the first time I did mess around with the last line out of desperation. I corrected the last line and opened it with Chrome and it works! So it would appear that the issue is with Inkscape. Do you know if the Inkscape devs know about this problem - I kinda rely heavily on it to tidy things up?
It's a known bug in Inkscape, reported here: https://gitlab.com/inkscape/inbox/-/issues/8753 - the workaround if you want Inkscape support is to not use the wildcard but spell it out in full (annoying, I know).
Another relevant bug you might experience in Inkscape is this: https://gitlab.com/inkscape/inbox/-/issues/2103
@Moult would you please give an example of how to replace the wild card? Do you mean the line in default.css, the metadata field, or both?
If only using Inkscape, I don't think there's another css approach like the following rule, that would work the same.
I'm not sure i answered your question.