BlenderBim Tutorial - Custom Lineweights & more - Discussion Thread

Happy New year everyone!
This is a dedicated thread to discuss a tutorial video:
Here are the step by step instructions:
1. Load previous file (to plan)
2. copy default CSS file (copy default to ifc location) found here:
C:\Users\YOUR-USER\AppData\Roaming\Blender Foundation\Blender\3.4\scripts\addons\blenderbim\bim\data\styles
3. rename custom CSS text file (rename default file) to Tut.css
4. Set custom file in Camera in BlenderBim
Select Camera
/ Object properties / Ifcobject metadata / Ifc object property sets
-> click edit
+add to style sheet: Tutorial.css
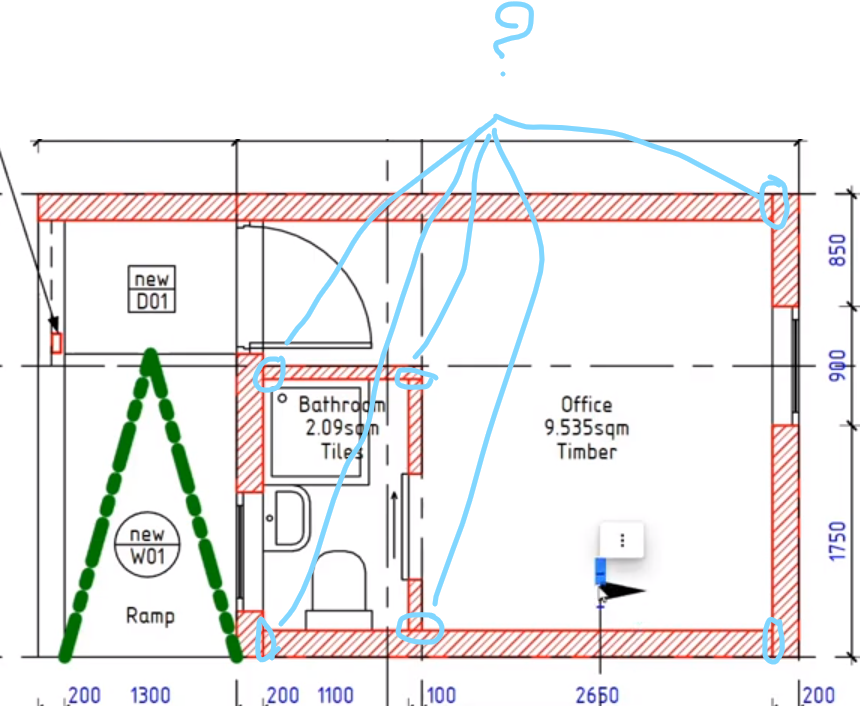
5. Edit line weights & styles (change default cut to red and default text to Blue)
change ramp linework to GREEN change thickness to 2 and give it a dash array (Object type)
copy BOUNDARY predefined type
6. Edit hatch patterns (Change brick to red and make finer) 3 steps
6.1 new pattern (in template folder) (edit directly):
6.2 new material(in tutorial.css file):
.material-redbrick { fill: url(#redbrick); }
6.3 select wall and name material layer set to 'redbrick'
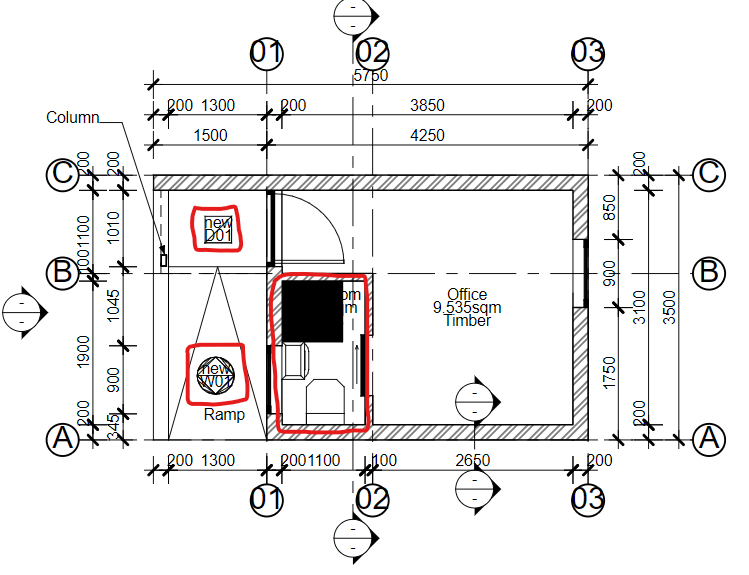
7. Edit markers (dimension tick size)
replace marker file
copy dimension marker start and end :
- edit section symbol (arrow heads)
- edit view title size marker
9.1. circle radius
r="2.5"
9.2. number font size / top text font size / bottom text font size
opengost size 2
If you have questions ask here!
And here are all the resources: (ifc files, css & svg)


 and 2 others.
Comments
Here is a txt file with the steps written out and the CSS code to copy, I can't get it to display properly here unfortunately
Thanks for your amazing videos.
How can we deal with the lines in common of the walls???
Unfortunately this is a manual process atm as far as I am aware, Dion is working on it, but at the moment the focus is on the modelling module, the drawing module will have a further update sometime in the future but for now and for myself I edit the final SVG in inkscape when it's all done.
But these things change quickly so it may soon be a thing of the past
Thanks for your reply. I imagine that is better focusing on the modelling module than the drawing one 'cause bim is more than a drawing.
Btw the results are very good.
Great video again! @Ace for editing the Css files do you think it would be better to use a Text Editor (Notepad++ or similar..)??
Thanks
Really nice tutorial! I was clueless on how to edit CSS files and where I could find them.
Thanks and yes I imagine it would be better I just prefer the simplest solution
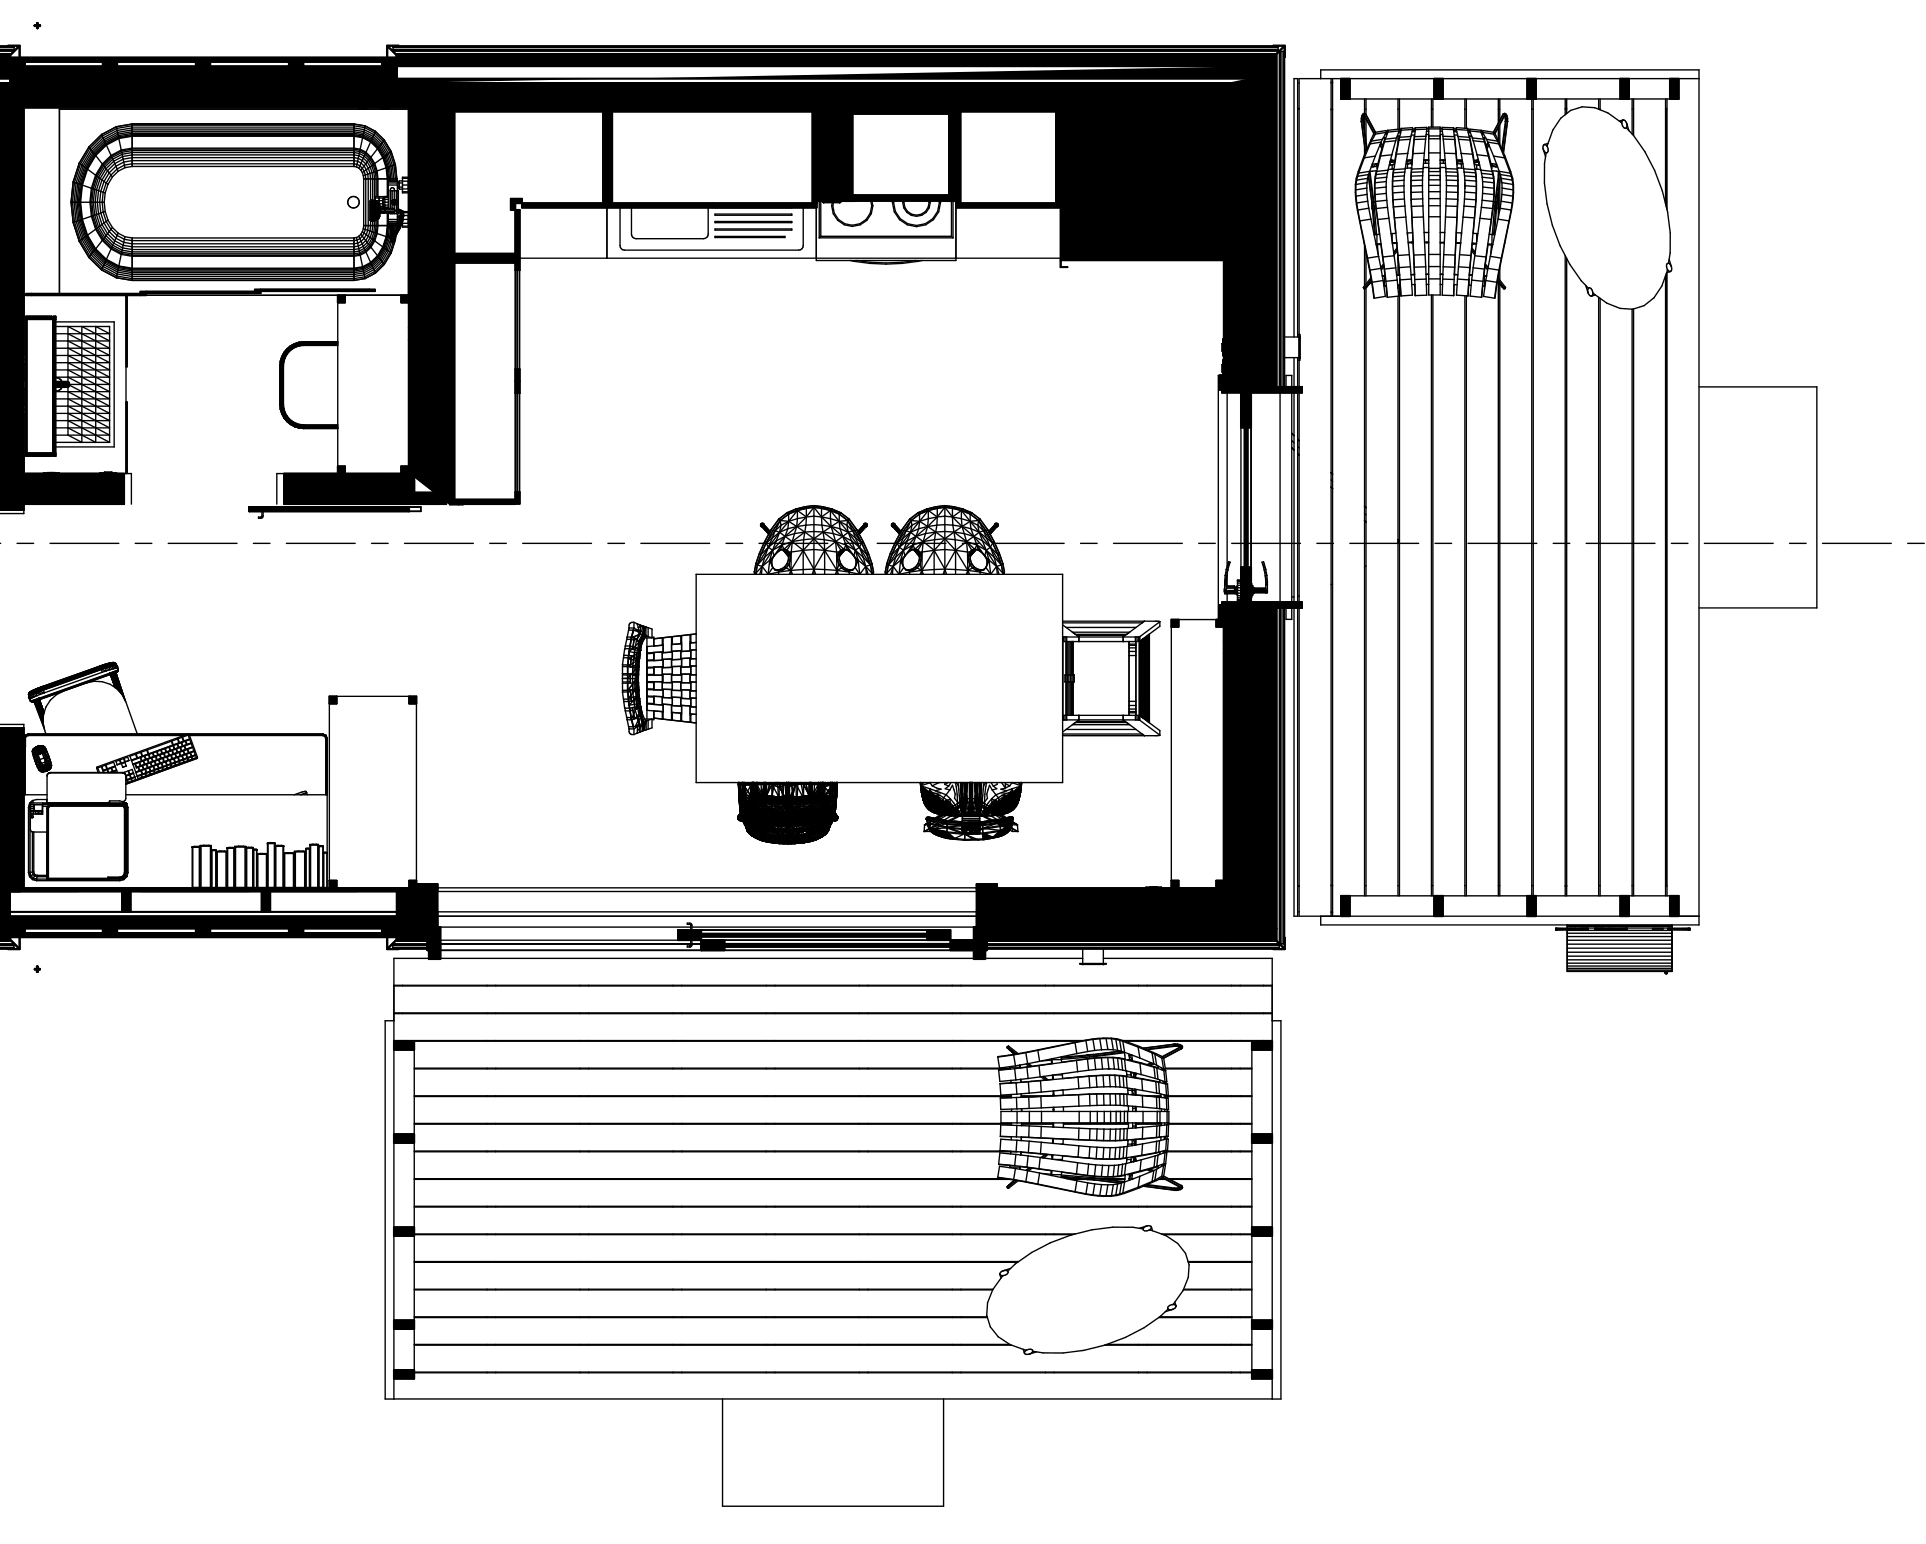
Hi there! Appreciate all the work done to show al the custom linework. I tied it out, but im having trouble with the SVG output, the print is still showing the tessellation for the sanitary and annotation the representation.
Im using V0.0.23.03.04 for the BlenderBIM and blender 3.4.1
I have tried changing the IFC geometry to show the 2d plan representation, but it still prints the same. Also tried selecting the geometry and clicking update representation in the object data properties tab in blender to no result. Imm not sure what the problems is and would appreciate any help or suggestions.
Hey @SavyGust27 You've done everything right so far, since that tutorial video there have been a few updates to how representation works
I am busy updating these resources to work with the new representation but in the mean time:
EDIT:
I've update the asset file, use this one and it should look right : ( attached)
Detail file for Lineweights_update representation 230312.ifc
If you want to do it manually you can read below
Fix 1: Door and Window tags,

You no longer need the door and window tags as separate ifctypes so you can delete them,
How to apply the fixed tags is to select the text object and go into object properties /ifc object metadata / Ifcproperty sets
then add a EPset_annotation and type in 'door-tag' to the class, use the same process and use a "square-tag" and this custom symbol file below (symbols with square tag.svg)
You can see the process here in this video around 9mins 33 seconds:
Fix 2: the representation for the Ifctypes changed
so use the Ifc4 AU library (below) as an update to the sanitaryware items
Load the appropriate types:
1 Toilet 1 basin 1 shower of your choice
delete the existing sanitaryware items and place the new ones
and the door and window types load from an update Ifc demo library (Ifc4 demo library 23.03.12) I have attached below and renamed with the date for clarity
Load a door type and a window type and change the type of the existing door and windows, if that doesnt work out you can delete the door and windows and re-add them to the model
Otherwise it shouldn't interfere with your editing on lineweights if that is your only goal then you don't need to change the above,
Otherwise you can use the version of blenderBim that was used for that tutorial and it should display correctly:
blenderbim-230125
You can download it here:
https://github.com/IfcOpenShell/IfcOpenShell/releases?page=2
Hope that helps
Thanks @Ace. Works as expected now. Thanks for the help
I've just created a standards test file, which can just help quickly test if all the standard styles are working:
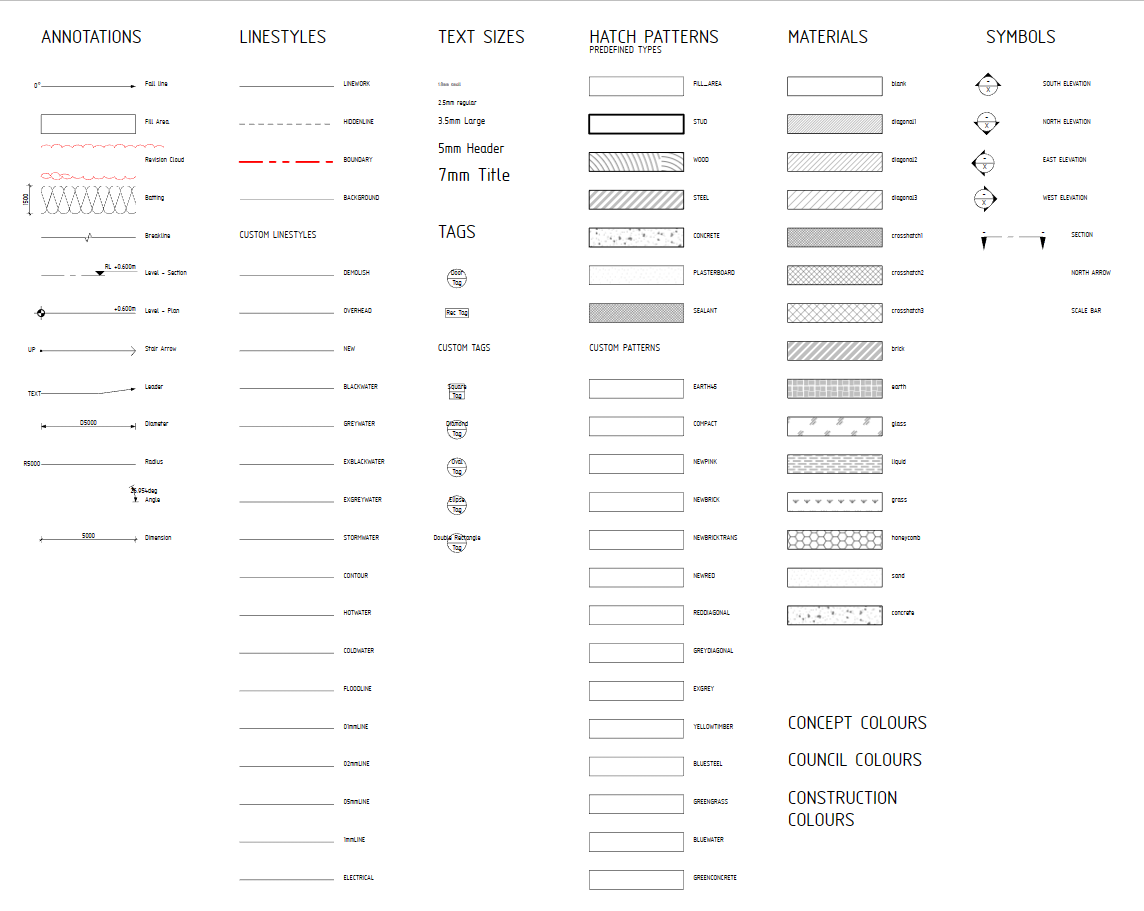
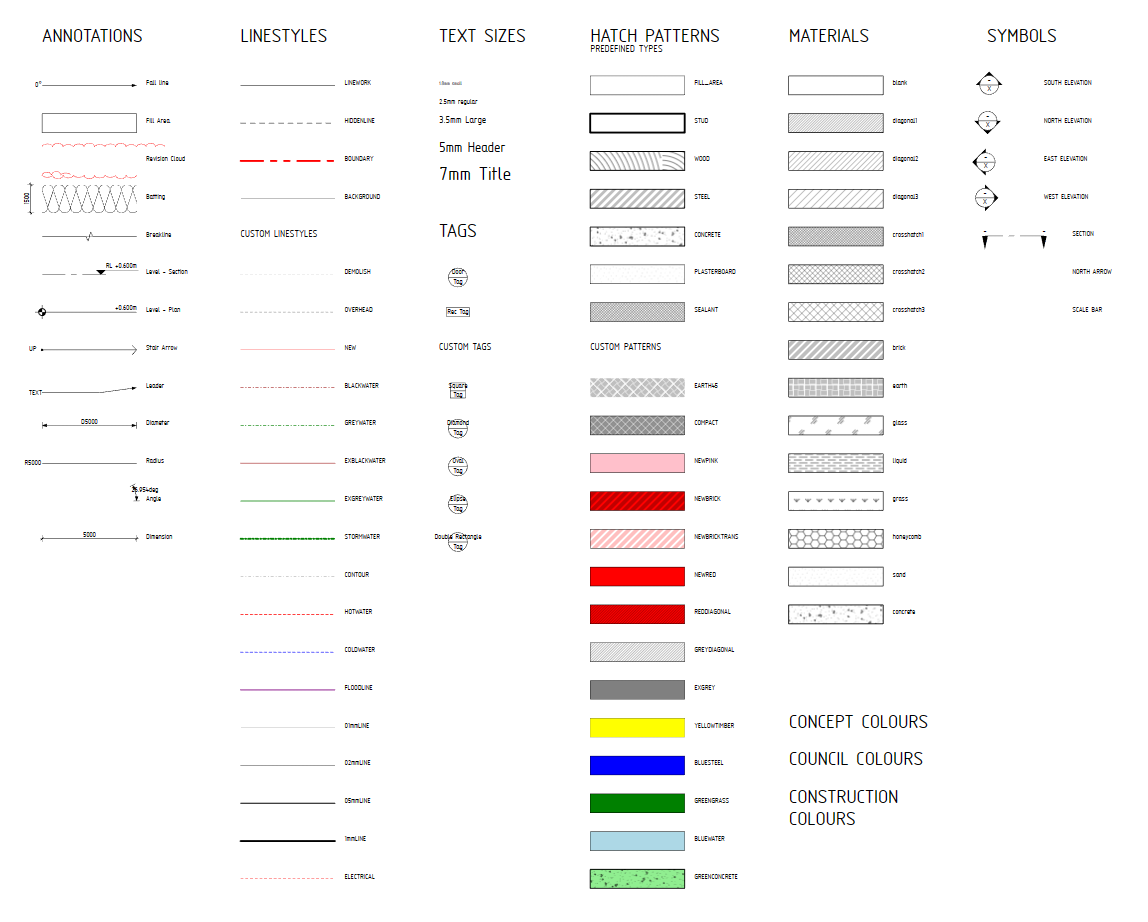
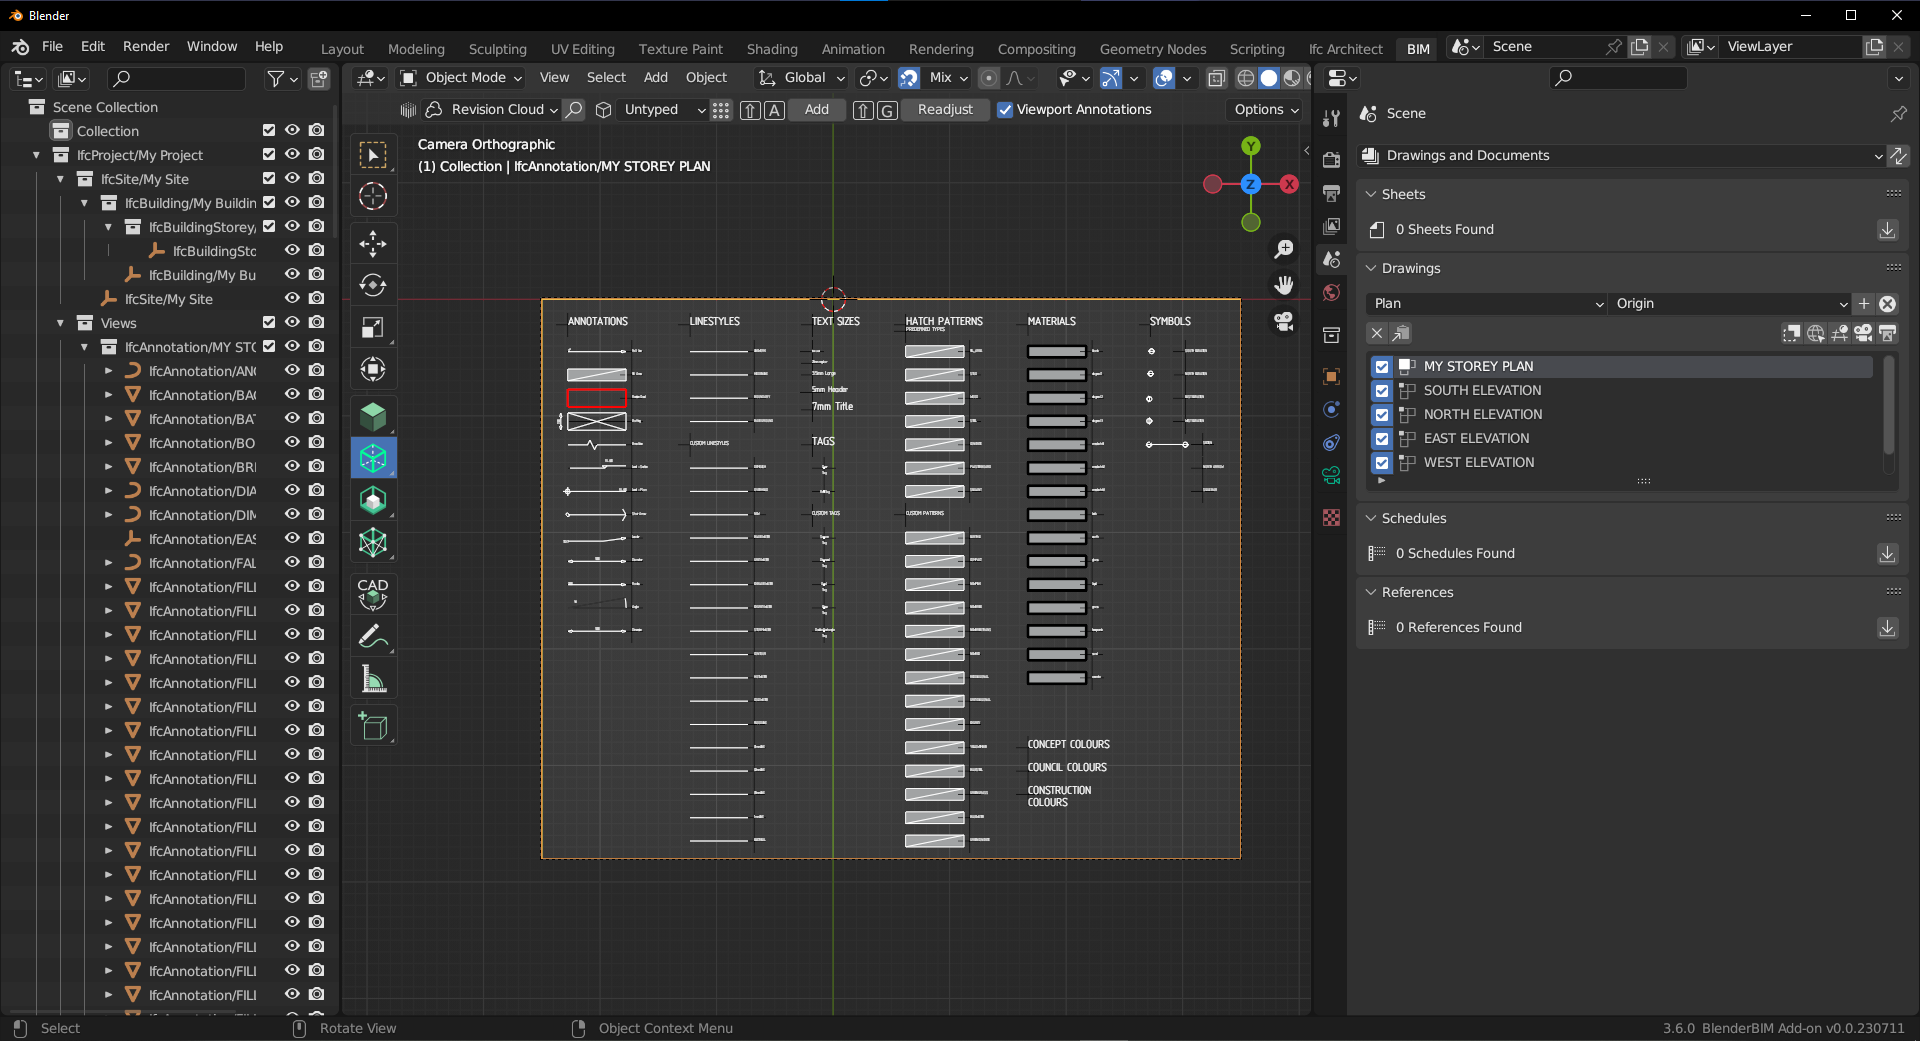
And also custom styles that I have created (some are still in process)
You can see the model space and Blender and BlenderBim versions here:
The revision cloud and angle line are not working as intended at the moment, but they have been reported as issues on the Github
The best way to add your own styles(patterns, lines, etc) is to:
1) edit the pattern.svg file
2) edit the default.css file
3) assign the appropriate files in the camera
4) Print to test
Here is the Zipped Ifc file with the styles (css, markers, symbols, patterns) inside:
Just remove the .txt and unzip the folder
Very cool!
Saved it to my debugging toolbox ?
Slighty related, I have been playing around a bit with the drawing functionality:
result:
But how do I go back to the "normal" view in the 3D view?
I don't won't like to see the camera, annotiations etc. just pure 3D
Related: https://github.com/IfcOpenShell/IfcOpenShell/issues/3423
Thanks for a good video.
As shown, you can set the LayerSetName and control how it looks on a drawing.
How can I do the same with a PipeSegment?
@nielshan just use a CSS class of IfcPipeSegment to change the way it looks.
I have tried to create a new class in the default.css file.
.IfcPipeSegment { fill: none; stroke: red; stroke-linecap: 'round'; stroke-width: 0.25; }
It works as you described. Thanks for the help @Moult
Hi,
I would like a different font on drawings and schedules. I can change the font in the default.css file for drawings.
But how do I change it in a schedule?
Good evening. How do I assign different styles to different elements (eg. trees, topo, ground covers etc.) belonging to the .IfcGeographicElement class in the CSS? I tried .IfcGeographicElement.name but didn’t work as below;
.IfcGeographicElement.grass { fill:none; stroke: lightgreen };.IfcGeographicElement.tree { fill:none; stroke:green};Thank you.
one way...
and if you want to make it specific to only the IfcGeographicElement class you could do...
Thank you very much @theoryshaw. You always bring relief ☺️.
solved below.
My bad. It was the scale I was defaulting to (1/8"=1'). When I bumped it to 1/2" =1' scale my changed settings became obvious, much cleaner. Will try to sort the fills/hatches now, thanks for the guidance @Ace Also, it's becoming clearer which of my AC objects export to IFC with a 2D object style and which do not!