@stephen_l thanks I'll try this, the performance issues are really hard to track down (background: homemaker is running several times slower in blender than on the command-line). Though I have been using pyinstrument, which does something similar to py-spy, and I see a slowdown in most methods.
@brunopostle I'm getting this error installing the Homemaker add-on:
ImportError: cannot import name 'import_ifc' from 'blenderbim' (..........config/blender/3.0/scripts/addons/blenderbim/init.py)
I'm running Blender 3.0 Alpha with the latest Blender Bim and the latest Homemaker release (both Linux, with Python 3.9 which matches Blender 3.0 alpha) on Ubuntu 20.04 running via WSL on a Windows machine. I know I'm testing fate with that combination but I'm hopeful to get it working.
I first installed and enabled BlenderBim with no issues, restarted Blender and then installed Homemaker and got the error when trying to enable it.
@DADA_universe said: @brunopostle I'm getting this error installing the Homemaker add-on:
ImportError: cannot import name 'import_ifc' from 'blenderbim' (..........config/blender/3.0/scripts/addons/blenderbim/init.py)
I'm running Blender 3.0 Alpha with the latest Blender Bim and the latest Homemaker release (both Linux, with Python 3.9 which matches Blender 3.0 alpha) on Ubuntu 20.04 running via WSL on a Windows machine. I know I'm testing fate with that combination but I'm hopeful to get it working.
I first installed and enabled BlenderBim with no issues, restarted Blender and then installed Homemaker and got the error when trying to enable it.
Part of the error: ERROR in cling::CIFactory::createCI(): cannot extract standard library include paths!
Part of the error: ERROR in cling::CIFactory::createCI(): cannot extract standard library include paths!
>
SOLVED (I think).
Seeing the error was complaining about the import_ifc.py file, I guessed it was trying to find it in the root of the BlenderBim folder, so I traced where the file was located and copied it to the BlenderBIm root folder. This then allowed me to enable Homemaker without error and Object > Homemaker Topologize now works.....now on to some experiments.....
@brunopostle, regarding the build for Windows, I can attempt this if you are able to give me some pointers. I probably would be able to give a bit more time to this towards the end of the month, but happy to start feeling my way round it.
Secondly, what do I need to be aware of to create custom styles? I see the dxf files in the styles/share folder and I assume some lines of code would need to be updated to reflect any variations to the existing styles. I also see you are driving the use of styles through the application of materials to selected parts of the mesh. I would like to try out custom styles, and I expect it's not as simple dumping in a file of dxfs into the styles folder.
SOLVED (I think).
Seeing the error was complaining about the import_ifc.py file, I guessed it was trying to find it in the root of the BlenderBim folder, so I traced where the file was located and copied it to the BlenderBIm root folder.
Something changed in blenderbim the last few days, the fix is to modify the from blenderbim import import_ifc line in the Homemaker __init__.py to from blenderbim.bim import import_ifc (which also sounds much better) . I should package a new release
@DADA_universe said: @brunopostle, regarding the build for Windows, I can attempt this if you are able to give me some pointers.
It is definitely possible. @topologic has a Windows build of the topologic sverchok nodes, and with this installed along with blenderbim, ezdxf and yaml python modules, the Homemaker add-on should run on Windows (untested).
The problem is that cppyy (which provides the topologic C++/python bindings) requires a C++ compiler on the system at runtime. So the Linux Homemaker add-on download actually includes a modified version of the clang compiler along with the other dependencies. The topologic sverchok nodes download for Windows is about 800 MB and it requires a particular version of Visual Studio installed on the system.
As impressive as cppyy is, it may be simpler to rewrite the C++ bindings with SWIG (though I don't know how to do this).
[edit] I should add that topologic Windows only needs Visual Studio for the headers, and much of that 800MB is superfluous opencascade libraries, so there is potential to produce a slimmed-down single-download for Windows.
Secondly, what do I need to be aware of to create custom styles? I see the dxf files in the styles/share folder and I assume some lines of code would need to be updated to reflect any variations to the existing styles. I also see you are driving the use of styles through the application of materials to selected parts of the mesh. I would like to try out custom styles, and I expect it's not as simple dumping in a file of dxfs into the styles folder.
The DXF files are assets that are converted into IFC libraries every time the add-on runs. This is very inefficient, so at some point I will convert them to IFC library files , drop the ezdxf dependency, and delete a lot of code. Blenderbim has had much recent work on IFC libraries, I probably no longer have any excuse.
Either way, the assets are only used if they are referenced in the *.yml files that are also present in the style folders. Much of the logic has been handed-over to these yaml files, so if you wanted to create a building where the walls are replaced by rows of rabbits with class IfcShadingDevice, PredefinedType: .JALOUSIE.. Pset_ShadingDeviceCommon: Roughness: "Cuddly", this can be done by editing an existing yaml configuration, or creating a new style folder 'bunnies' with a custom set of style files.
Styles are inherited, so the 'bunnies' style will inherit any doors, windows etc.. from the 'default' style; and depending on where you put the 'bunnies' folder, it will also inherit from any other parent folder in-between. The style is activated by assigning materials to faces in the original blender sketch model, so faces with materials called "bunnies" or "bunnies.001" etc.. will produce building elements defined by the 'bunnies' style. There is a bit more explanation in the style module sourcecode. [I'm going to get a coffee, tbc]
Homemaker works just fine on Windows :) You need to install all the pre-requisites and activate in order:
BlenderBIM
ezdxf
pyyaml (yaml)
topologic-sverchok (includes cppyy and topologicPy for Windows)
The style is activated by assigning materials to faces in the original blender sketch model, so faces with materials called "bunnies" or "bunnies.001" etc.. will produce building elements defined by the 'bunnies' style. There is a bit more explanation in the style module sourcecode.
Other than the geometry of the sketch model itself, the other thing you can do to control what gets produced is to assign space-types. At the moment the behaviour of these are all hard-coded, but eventually it will be configurable. There are currently several space types: living, kitchen, circulation, stair, toilet, bedroom and retail; these primarily control which door and window configuration gets used: retail on the ground floor can get a series of shop fronts, no doors are created between kitchens and toilets etc.. I haven't got around to porting the stair drawing module just yet. There are two special space types: 'outdoor' and 'sahn', these generate outdoor spaces that the 'default' style constructs with a flat roof supported by perimeter posts. 'sahn' is an outdoor space type that is treated as internal circulation - think of a private courtyard in a riad house.
By default every space in your model has a 'living' type, so you get windows, doors between rooms, but no external doors. You can manually assign types by placing new blender objects (such as a new cube) in each of the spaces: give the new object the name 'retail' (or 'retail.001' etc..) and the space becomes a room with this type. If you forget to name or mis-spell this placeholder you will get a very small cube-shaped building inside your main building :). Once you start using these placeholders in a model, any unassigned spaces become 'outdoor'.
The geometry of the sketch mesh is decomposed using topologic into two kinds of objects: 'traces' and 'hulls', which each have a corresponding traces.yml and hulls.yml in the style definitions. 'traces' are 2D paths that define 'conditions' like wall centrelines or any other feature such as eaves or footings that can be defined by a 2D path. Processing the sketch mesh generates a whole load of these 'traces', only some of which are picked-up by the default style and turned into IFC objects, but all of them are available to be picked-up by other styles. 'hulls' are produced by geometry that can't be decomposed into traces, typically roof geometry.
There is some more documentation for traces and hulls in the code. But really I need to show some examples..
There are two linux downloads, download py37 or py39 to correspond to the version of blenderbim that you have installed above (the blender download from blender.org uses py37, except 2.93 or later that uses py39).
Install the add-on by browsing for the zip archive in the blender preferences, and enable (if you already have an older version of the add-on, uninstall it and restart blender before installing the newer add-on)
To test, select the default cube and choose 'Homemaker Topologise' in the 'Object' menu.
@brunopostle said:
Other than the geometry of the sketch model itself, the other thing you can do to control what gets produced is to assign space-types. At the moment the behaviour of these are all hard-coded, but eventually it will be configurable. There are currently several space types: living, kitchen, circulation, stair, toilet, bedroom and retail; these primarily control which door and window configuration gets used: retail on the ground floor can get a series of shop fronts, no doors are created between kitchens and toilets etc.. I haven't got around to porting the stair drawing module just yet. There are two special space types: 'outdoor' and 'sahn', these generate outdoor spaces that the 'default' style constructs with a flat roof supported by perimeter posts. 'sahn' is an outdoor space type that is treated as internal circulation - think of a private courtyard in a riad house.
By default every space in your model has a 'living' type, so you get windows, doors between rooms, but no external doors. You can manually assign types by placing new blender objects (such as a new cube) in each of the spaces: give the new object the name 'retail' (or 'retail.001' etc..) and the space becomes a room with this type. If you forget to name or mis-spell this placeholder you will get a very small cube-shaped building inside your main building :). Once you start using these placeholders in a model, any unassigned spaces become 'outdoor'.
The geometry of the sketch mesh is decomposed using topologic into two kinds of objects: 'traces' and 'hulls', which each have a corresponding traces.yml and hulls.yml in the style definitions. 'traces' are 2D paths that define 'conditions' like wall centrelines or any other feature such as eaves or footings that can be defined by a 2D path. Processing the sketch mesh generates a whole load of these 'traces', only some of which are picked-up by the default style and turned into IFC objects, but all of them are available to be picked-up by other styles. 'hulls' are produced by geometry that can't be decomposed into traces, typically roof geometry.
There is some more documentation for traces and hulls in the code. But really I need to show some examples..
Thanks, this is helpful, I was finding some insight from looking through the yaml files, but this puts things in proper perspective. The notes on the source code are also helpful.
topologic-sverchok (includes cppyy and topologicPy for Windows)
Thanks. Drilling down. The other requirements seem straight forward, however for this one, do you mean topologic-sverchok now includes cppy and topologicPy or those still have to be installed separately? From the topologicPy repo and from what @brunopostle referred to earlier, I seem to understand that a cmake build is necessary for Windows and this needs to be done in Visual Studio. I'm fumbling around trying to do that and I can't record any success yet. Please let me know if I've got it all mixed up.
topologic-sverchok (includes cppyy and topologicPy for Windows)
Thanks. Drilling down. The other requirements seem straight forward, however for this one, do you mean topologic-sverchok now includes cppy and topologicPy or those still have to be installed separately?
There is an 800mb Topologic Sverchok download that includes, cppyy, Topologic, and dependencies.
From the topologicPy repo and from what @brunopostle referred to earlier, I seem to understand that a cmake build is necessary for Windows and this needs to be done in Visual Studio. I'm fumbling around trying to do that and I can't record any success yet. Please let me know if I've got it all mixed up.
You shouldn't have to recompile the Topologic Sverchok add-on. Visual Studio is only necessary because cppyy needs to be able to read the Topologic C++ headers, and these in-turn #include standard C++ headers. The best way to get a full set of standard C++ headers on Windows is to install Visual Studio, but I don't think you need anything else from VS.
An alternative way of bundling the add-on would be to figure-out which VS headers are necessary (they seem to be BSD licensed) and put them in the add-on (this is what I have done for the Homemaker Linux bundle).
There is an 800mb Topologic Sverchok download that includes, cppyy, Topologic, and dependencies.
I only found this one: https://github.com/wassimj/topologicsverchok
I installed it and looked through the content of the folder, didn't find anything like cppyy or the Topologic core, and then in Blender it threw this error: The system cannot find the path specified: 'C:................Blender Foundation\Blender\3.0\scripts\addons\topologicsverchok-main\topologicPy\site-packages' hence why I thought maybe I needed to run a build or something.
You shouldn't have to recompile the Topologic Sverchok add-on. Visual Studio is only necessary because cppyy needs to be able to read the Topologic C++ headers, and these in-turn #include standard C++ headers. The best way to get a full set of standard C++ headers on Windows is to install Visual Studio, but I don't think you need anything else from VS.
I have Visual Studio installed, but not sure what to do with it in terms of the above. Also that was not for the Topologic Sverchok add-on but for the topologic.py depencency.
An alternative way of bundling the add-on would be to figure-out which VS headers are necessary (they seem to be BSD licensed) and put them in the add-on (this is what I have done for the Homemaker Linux bundle).
Hi @DADA_universe and @brunopostle The bundled version of Topologic is _only _a 300MB download :) You can find it at https://topologic.app/link/ Scroll down to experimental versions and download TopologicSV-Windows-1.0.0.zip
You need to install this ZIP file in the add-ons/scripts folder of Blender and unzip it there so that there is a folder called topologicsverchok in that location. Then restart Blender and try to activate the Topologic plug-in. For it to work you first need BlenderBIM and openstudio installed in the same folder and activated first.
It has worked for some, but for others they faced issues. You definitely need to have Admin account to do this. Please report any difficulties. If it does not work, then you need to build from source (instructions are in the readme on github) in the following order:
1. Install opencascade 0.7.4
2. Install TopologicCore from http://github.com/wassimj
3. Install TopologicPy (including installation of cppyy)
4. Install Topologic-Sverchok
@brunopostle said:
300MB is much better, do you still need Visual Studio?
I believe so. It is difficult for me to test because I only use my laptop which already has everything installed. I need someone else to test installing it and to report back what works and what doesn’t.
@topologic said:
Hi @DADA_universe and @brunopostle The bundled version of Topologic is _only _a 300MB download :) You can find it at https://topologic.app/link/ Scroll down to experimental versions and download TopologicSV-Windows-1.0.0.zip
You need to install this ZIP file in the add-ons/scripts folder of Blender and unzip it there so that there is a folder called topologicsverchok in that location. Then restart Blender and try to activate the Topologic plug-in. For it to work you first need BlenderBIM and openstudio installed in the same folder and activated first.
>
Followed along with this, but enabling the Topologic add-on crashes Blender, and this is what I've observed in the logs:
Not sure what, if anything this has to do with Sverchok.
On the OpenStudio requirement, does that come bundled with any of the addons? I looked it up and there is no Blender addon on their site, when I installed it globally from an .exe from their site, it complained that another session was already running.
Ah sorry. Then what I suggest is that you carefully follow the steps in the following document: https://github.com/wassimj/topologicsverchok/blob/main/README-windows.md
To install openstudio, while you are in the Anaconda virtual environment, issue pip install openstudio and copy it same as cppyy
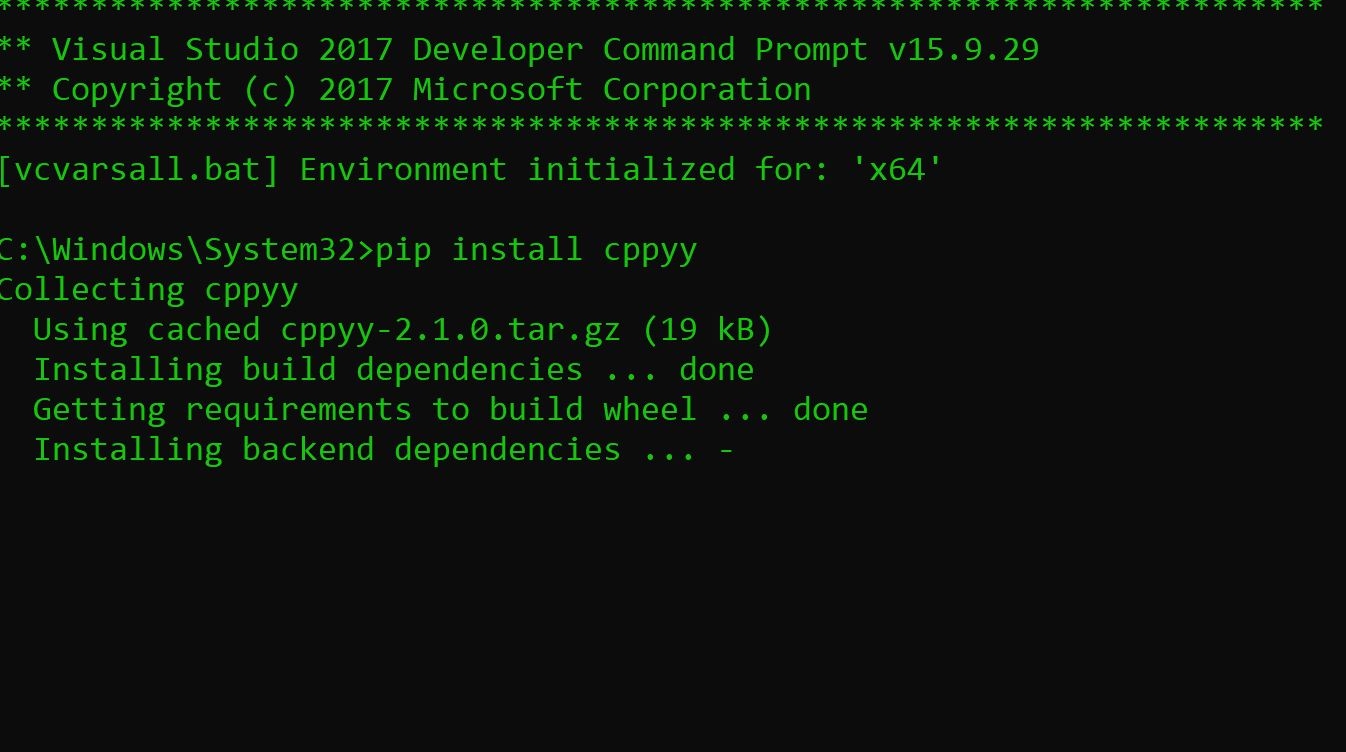
Thanks for the link. Apparently it's not so trivial installing cppyy on Windows. Each attempt takes over an hour and I've only been getting errors after several attempts.
It stays stuck on that forever and then throws errors
It appears using conda to install in a virtual environment is what works, I noticed this is what was described for installing for Blender, so I did that and it worked without issues.
Next error was with installing Topologic. Running WindowsBuild.bat after cloning Topologic from git throws this error:
CMake Error: CMAKE_CXX_COMPILER not set, after EnableLanguage
-- Configuring incomplete, errors occurred!
See also "C:/Users/ATTITA/topologicbim/Topologic/build/CMakeFiles/CMakeOutput.log".
'nmake' is not recognized as an internal or external command,
operable program or batch file.
The system cannot find the file ..Release.
There is actually no \output\x64\ directory and WindowsBuild.bat has the following content: @mkdir build @cd build @cmake -G "NMake Makefiles" -DCMAKE_BUILD_TYPE=Release .. @nmake @start ..\output\x64\Release @cd ..
Also the sequence for installation for Blender is not clear on what part of the previous steps need to be carried out before installing for Blender. For example, do you have to install cppyy globally and still install it in the conda environment for Blender or does the Blender installation suffice?
Dear @DADA_universe . Apologies. Yes the instructions are a bit chaotic and out of date (VS2019 is needed not VS2017) because you can install Topologic outside of Blender, but also within Blender. The good news is that today I have been testing the installation on Windows with 3 people that never had Topologic or Blender installed and I think we have finally figured it out and it should be straightforward in three steps. I have posted the new instructions at: https://github.com/wassimj/topologicsverchok/blob/main/README-windows.md


Comments
Still facing with weired perf issues, maybe py-spy could help to profile ?
sudo py-spy top --pid 'grep blender'
@stephen_l thanks I'll try this, the performance issues are really hard to track down (background: homemaker is running several times slower in blender than on the command-line). Though I have been using pyinstrument, which does something similar to py-spy, and I see a slowdown in most methods.
This is really amazing, impressive, outstanding work!
@brunopostle I'm getting this error installing the Homemaker add-on:
ImportError: cannot import name 'import_ifc' from 'blenderbim' (..........config/blender/3.0/scripts/addons/blenderbim/init.py)
I'm running Blender 3.0 Alpha with the latest Blender Bim and the latest Homemaker release (both Linux, with Python 3.9 which matches Blender 3.0 alpha) on Ubuntu 20.04 running via WSL on a Windows machine. I know I'm testing fate with that combination but I'm hopeful to get it working.
I first installed and enabled BlenderBim with no issues, restarted Blender and then installed Homemaker and got the error when trying to enable it.
Part of the error: ERROR in cling::CIFactory::createCI(): cannot extract standard library include paths!
>
SOLVED (I think).
Seeing the error was complaining about the import_ifc.py file, I guessed it was trying to find it in the root of the BlenderBim folder, so I traced where the file was located and copied it to the BlenderBIm root folder. This then allowed me to enable Homemaker without error and Object > Homemaker Topologize now works.....now on to some experiments.....
@brunopostle, regarding the build for Windows, I can attempt this if you are able to give me some pointers. I probably would be able to give a bit more time to this towards the end of the month, but happy to start feeling my way round it.
Secondly, what do I need to be aware of to create custom styles? I see the dxf files in the styles/share folder and I assume some lines of code would need to be updated to reflect any variations to the existing styles. I also see you are driving the use of styles through the application of materials to selected parts of the mesh. I would like to try out custom styles, and I expect it's not as simple dumping in a file of dxfs into the styles folder.
Something changed in blenderbim the last few days, the fix is to modify the
from blenderbim import import_ifcline in the Homemaker__init__.pytofrom blenderbim.bim import import_ifc(which also sounds much better) . I should package a new releaseIt is definitely possible. @topologic has a Windows build of the topologic sverchok nodes, and with this installed along with blenderbim, ezdxf and yaml python modules, the Homemaker add-on should run on Windows (untested).
The problem is that cppyy (which provides the topologic C++/python bindings) requires a C++ compiler on the system at runtime. So the Linux Homemaker add-on download actually includes a modified version of the clang compiler along with the other dependencies. The topologic sverchok nodes download for Windows is about 800 MB and it requires a particular version of Visual Studio installed on the system.
As impressive as cppyy is, it may be simpler to rewrite the C++ bindings with SWIG (though I don't know how to do this).
[edit] I should add that topologic Windows only needs Visual Studio for the headers, and much of that 800MB is superfluous opencascade libraries, so there is potential to produce a slimmed-down single-download for Windows.
The DXF files are assets that are converted into IFC libraries every time the add-on runs. This is very inefficient, so at some point I will convert them to IFC library files , drop the ezdxf dependency, and delete a lot of code. Blenderbim has had much recent work on IFC libraries, I probably no longer have any excuse.
Either way, the assets are only used if they are referenced in the *.yml files that are also present in the style folders. Much of the logic has been handed-over to these yaml files, so if you wanted to create a building where the walls are replaced by rows of rabbits with class
IfcShadingDevice,PredefinedType: .JALOUSIE..Pset_ShadingDeviceCommon: Roughness: "Cuddly", this can be done by editing an existing yaml configuration, or creating a new style folder 'bunnies' with a custom set of style files.Styles are inherited, so the 'bunnies' style will inherit any doors, windows etc.. from the 'default' style; and depending on where you put the 'bunnies' folder, it will also inherit from any other parent folder in-between. The style is activated by assigning materials to faces in the original blender sketch model, so faces with materials called "bunnies" or "bunnies.001" etc.. will produce building elements defined by the 'bunnies' style. There is a bit more explanation in the style module sourcecode. [I'm going to get a coffee, tbc]
Homemaker works just fine on Windows :) You need to install all the pre-requisites and activate in order:
BlenderBIM
ezdxf
pyyaml (yaml)
topologic-sverchok (includes cppyy and topologicPy for Windows)
Other than the geometry of the sketch model itself, the other thing you can do to control what gets produced is to assign space-types. At the moment the behaviour of these are all hard-coded, but eventually it will be configurable. There are currently several space types: living, kitchen, circulation, stair, toilet, bedroom and retail; these primarily control which door and window configuration gets used: retail on the ground floor can get a series of shop fronts, no doors are created between kitchens and toilets etc.. I haven't got around to porting the stair drawing module just yet. There are two special space types: 'outdoor' and 'sahn', these generate outdoor spaces that the 'default' style constructs with a flat roof supported by perimeter posts. 'sahn' is an outdoor space type that is treated as internal circulation - think of a private courtyard in a riad house.
By default every space in your model has a 'living' type, so you get windows, doors between rooms, but no external doors. You can manually assign types by placing new blender objects (such as a new cube) in each of the spaces: give the new object the name 'retail' (or 'retail.001' etc..) and the space becomes a room with this type. If you forget to name or mis-spell this placeholder you will get a very small cube-shaped building inside your main building :). Once you start using these placeholders in a model, any unassigned spaces become 'outdoor'.
The geometry of the sketch mesh is decomposed using topologic into two kinds of objects: 'traces' and 'hulls', which each have a corresponding
traces.ymlandhulls.ymlin the style definitions. 'traces' are 2D paths that define 'conditions' like wall centrelines or any other feature such as eaves or footings that can be defined by a 2D path. Processing the sketch mesh generates a whole load of these 'traces', only some of which are picked-up by the default style and turned into IFC objects, but all of them are available to be picked-up by other styles. 'hulls' are produced by geometry that can't be decomposed into traces, typically roof geometry.There is some more documentation for traces and hulls in the code. But really I need to show some examples..
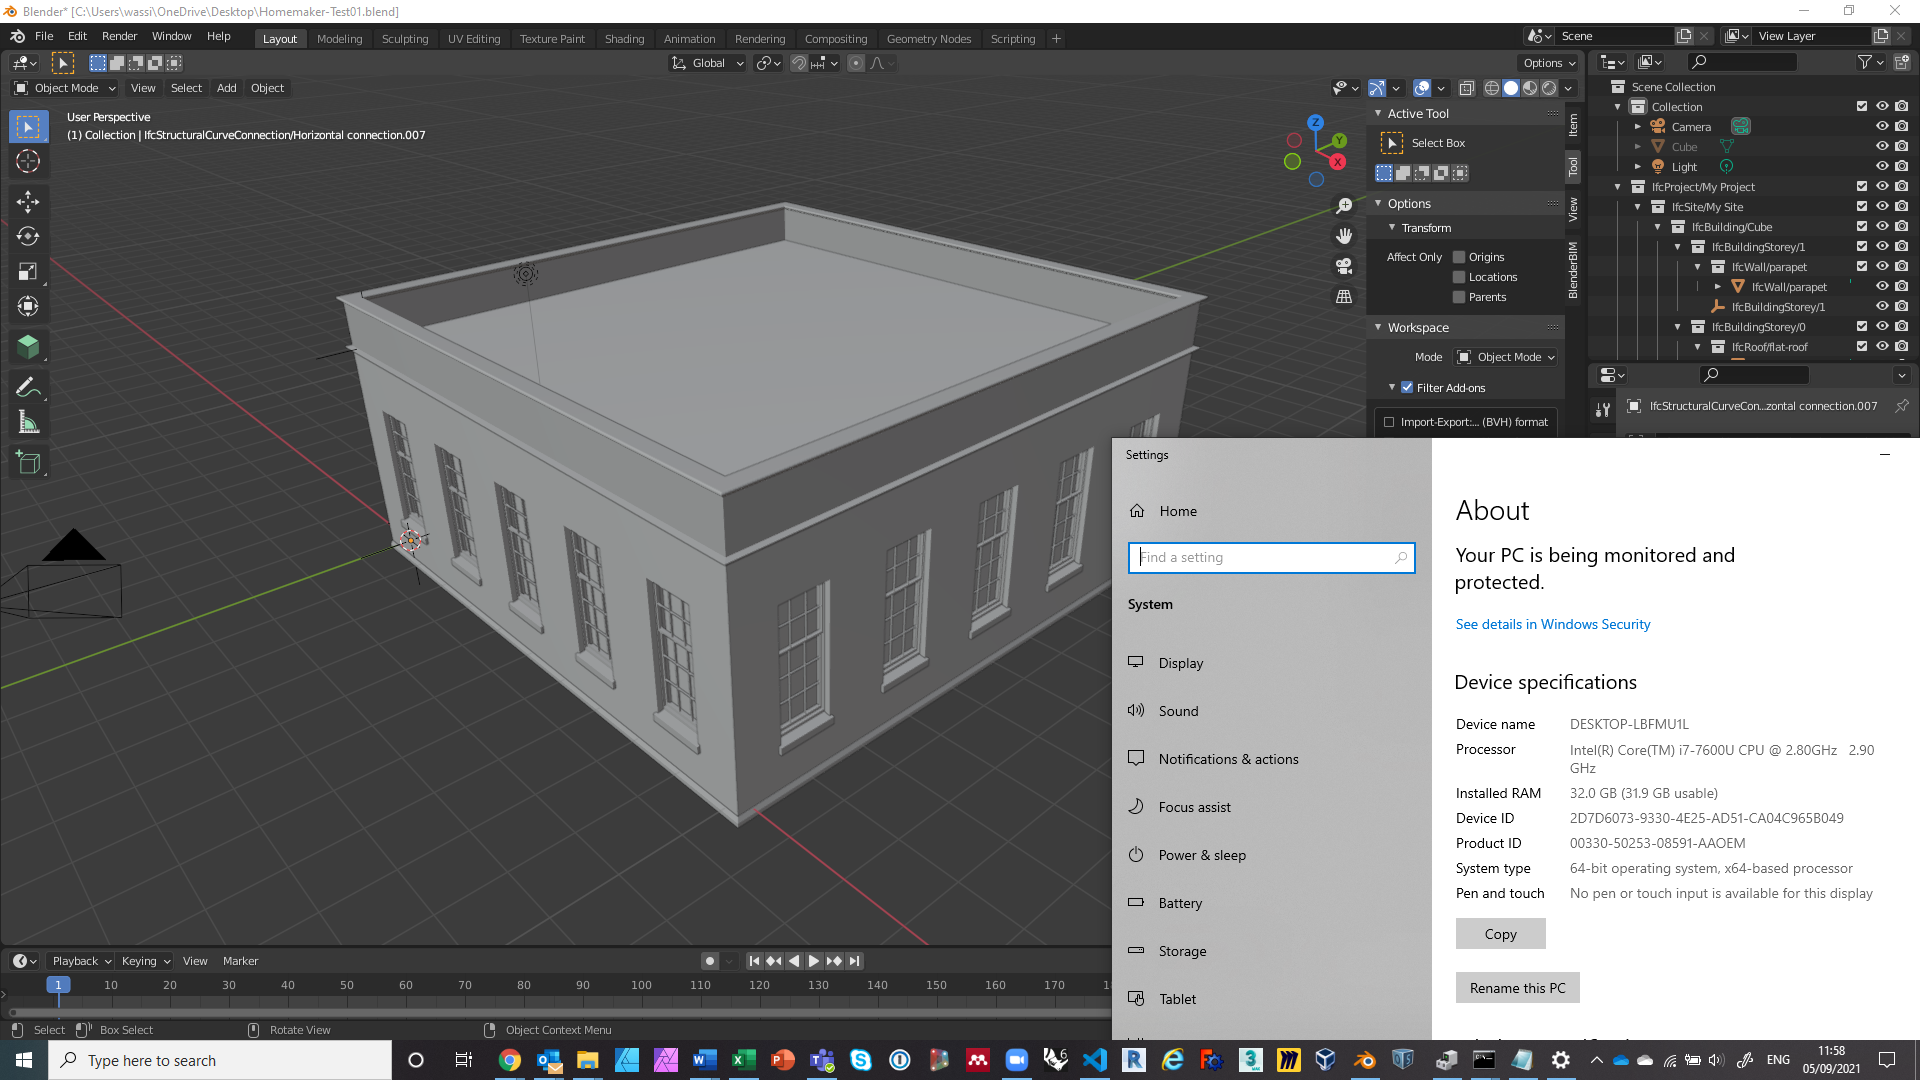
There is a new blender-homemaker-2021-09-05-linux-x86_64 release
This is a test of packaging the Homemaker add-on and dependencies for linux.
This release includes:
I don't really expect it to work everywhere, but would like any error messages or any reports of success, please open an issue, or add a comment to an existing issue.
Requirements
There are two linux downloads, download py37 or py39 to correspond to the version of blenderbim that you have installed above (the blender download from blender.org uses py37, except 2.93 or later that uses py39).
Install the add-on by browsing for the zip archive in the blender preferences, and enable (if you already have an older version of the add-on, uninstall it and restart blender before installing the newer add-on)
To test, select the default cube and choose 'Homemaker Topologise' in the 'Object' menu.
Thanks, this is helpful, I was finding some insight from looking through the yaml files, but this puts things in proper perspective. The notes on the source code are also helpful.
Thanks. Drilling down. The other requirements seem straight forward, however for this one, do you mean topologic-sverchok now includes cppy and topologicPy or those still have to be installed separately? From the topologicPy repo and from what @brunopostle referred to earlier, I seem to understand that a cmake build is necessary for Windows and this needs to be done in Visual Studio. I'm fumbling around trying to do that and I can't record any success yet. Please let me know if I've got it all mixed up.
There is an 800mb Topologic Sverchok download that includes, cppyy, Topologic, and dependencies.
You shouldn't have to recompile the Topologic Sverchok add-on. Visual Studio is only necessary because cppyy needs to be able to read the Topologic C++ headers, and these in-turn #include standard C++ headers. The best way to get a full set of standard C++ headers on Windows is to install Visual Studio, but I don't think you need anything else from VS.
An alternative way of bundling the add-on would be to figure-out which VS headers are necessary (they seem to be BSD licensed) and put them in the add-on (this is what I have done for the Homemaker Linux bundle).
I only found this one: https://github.com/wassimj/topologicsverchok
I installed it and looked through the content of the folder, didn't find anything like cppyy or the Topologic core, and then in Blender it threw this error: The system cannot find the path specified: 'C:................Blender Foundation\Blender\3.0\scripts\addons\topologicsverchok-main\topologicPy\site-packages' hence why I thought maybe I needed to run a build or something.
I have Visual Studio installed, but not sure what to do with it in terms of the above. Also that was not for the Topologic Sverchok add-on but for the topologic.py depencency.
Yes this will would be nice.
Hi @DADA_universe and @brunopostle The bundled version of Topologic is _only _a 300MB download :) You can find it at https://topologic.app/link/ Scroll down to experimental versions and download TopologicSV-Windows-1.0.0.zip
You need to install this ZIP file in the add-ons/scripts folder of Blender and unzip it there so that there is a folder called topologicsverchok in that location. Then restart Blender and try to activate the Topologic plug-in. For it to work you first need BlenderBIM and openstudio installed in the same folder and activated first.
It has worked for some, but for others they faced issues. You definitely need to have Admin account to do this. Please report any difficulties. If it does not work, then you need to build from source (instructions are in the readme on github) in the following order:
1. Install opencascade 0.7.4
2. Install TopologicCore from http://github.com/wassimj
3. Install TopologicPy (including installation of cppyy)
4. Install Topologic-Sverchok
300MB is much better, do you still need Visual Studio?
I believe so. It is difficult for me to test because I only use my laptop which already has everything installed. I need someone else to test installing it and to report back what works and what doesn’t.
>
Followed along with this, but enabling the Topologic add-on crashes Blender, and this is what I've observed in the logs:
Not sure what, if anything this has to do with Sverchok.
On the OpenStudio requirement, does that come bundled with any of the addons? I looked it up and there is no Blender addon on their site, when I installed it globally from an .exe from their site, it complained that another session was already running.
Ah sorry. Then what I suggest is that you carefully follow the steps in the following document:
https://github.com/wassimj/topologicsverchok/blob/main/README-windows.md
To install openstudio, while you are in the Anaconda virtual environment, issue pip install openstudio and copy it same as cppyy
Thanks for the link. Apparently it's not so trivial installing cppyy on Windows. Each attempt takes over an hour and I've only been getting errors after several attempts.
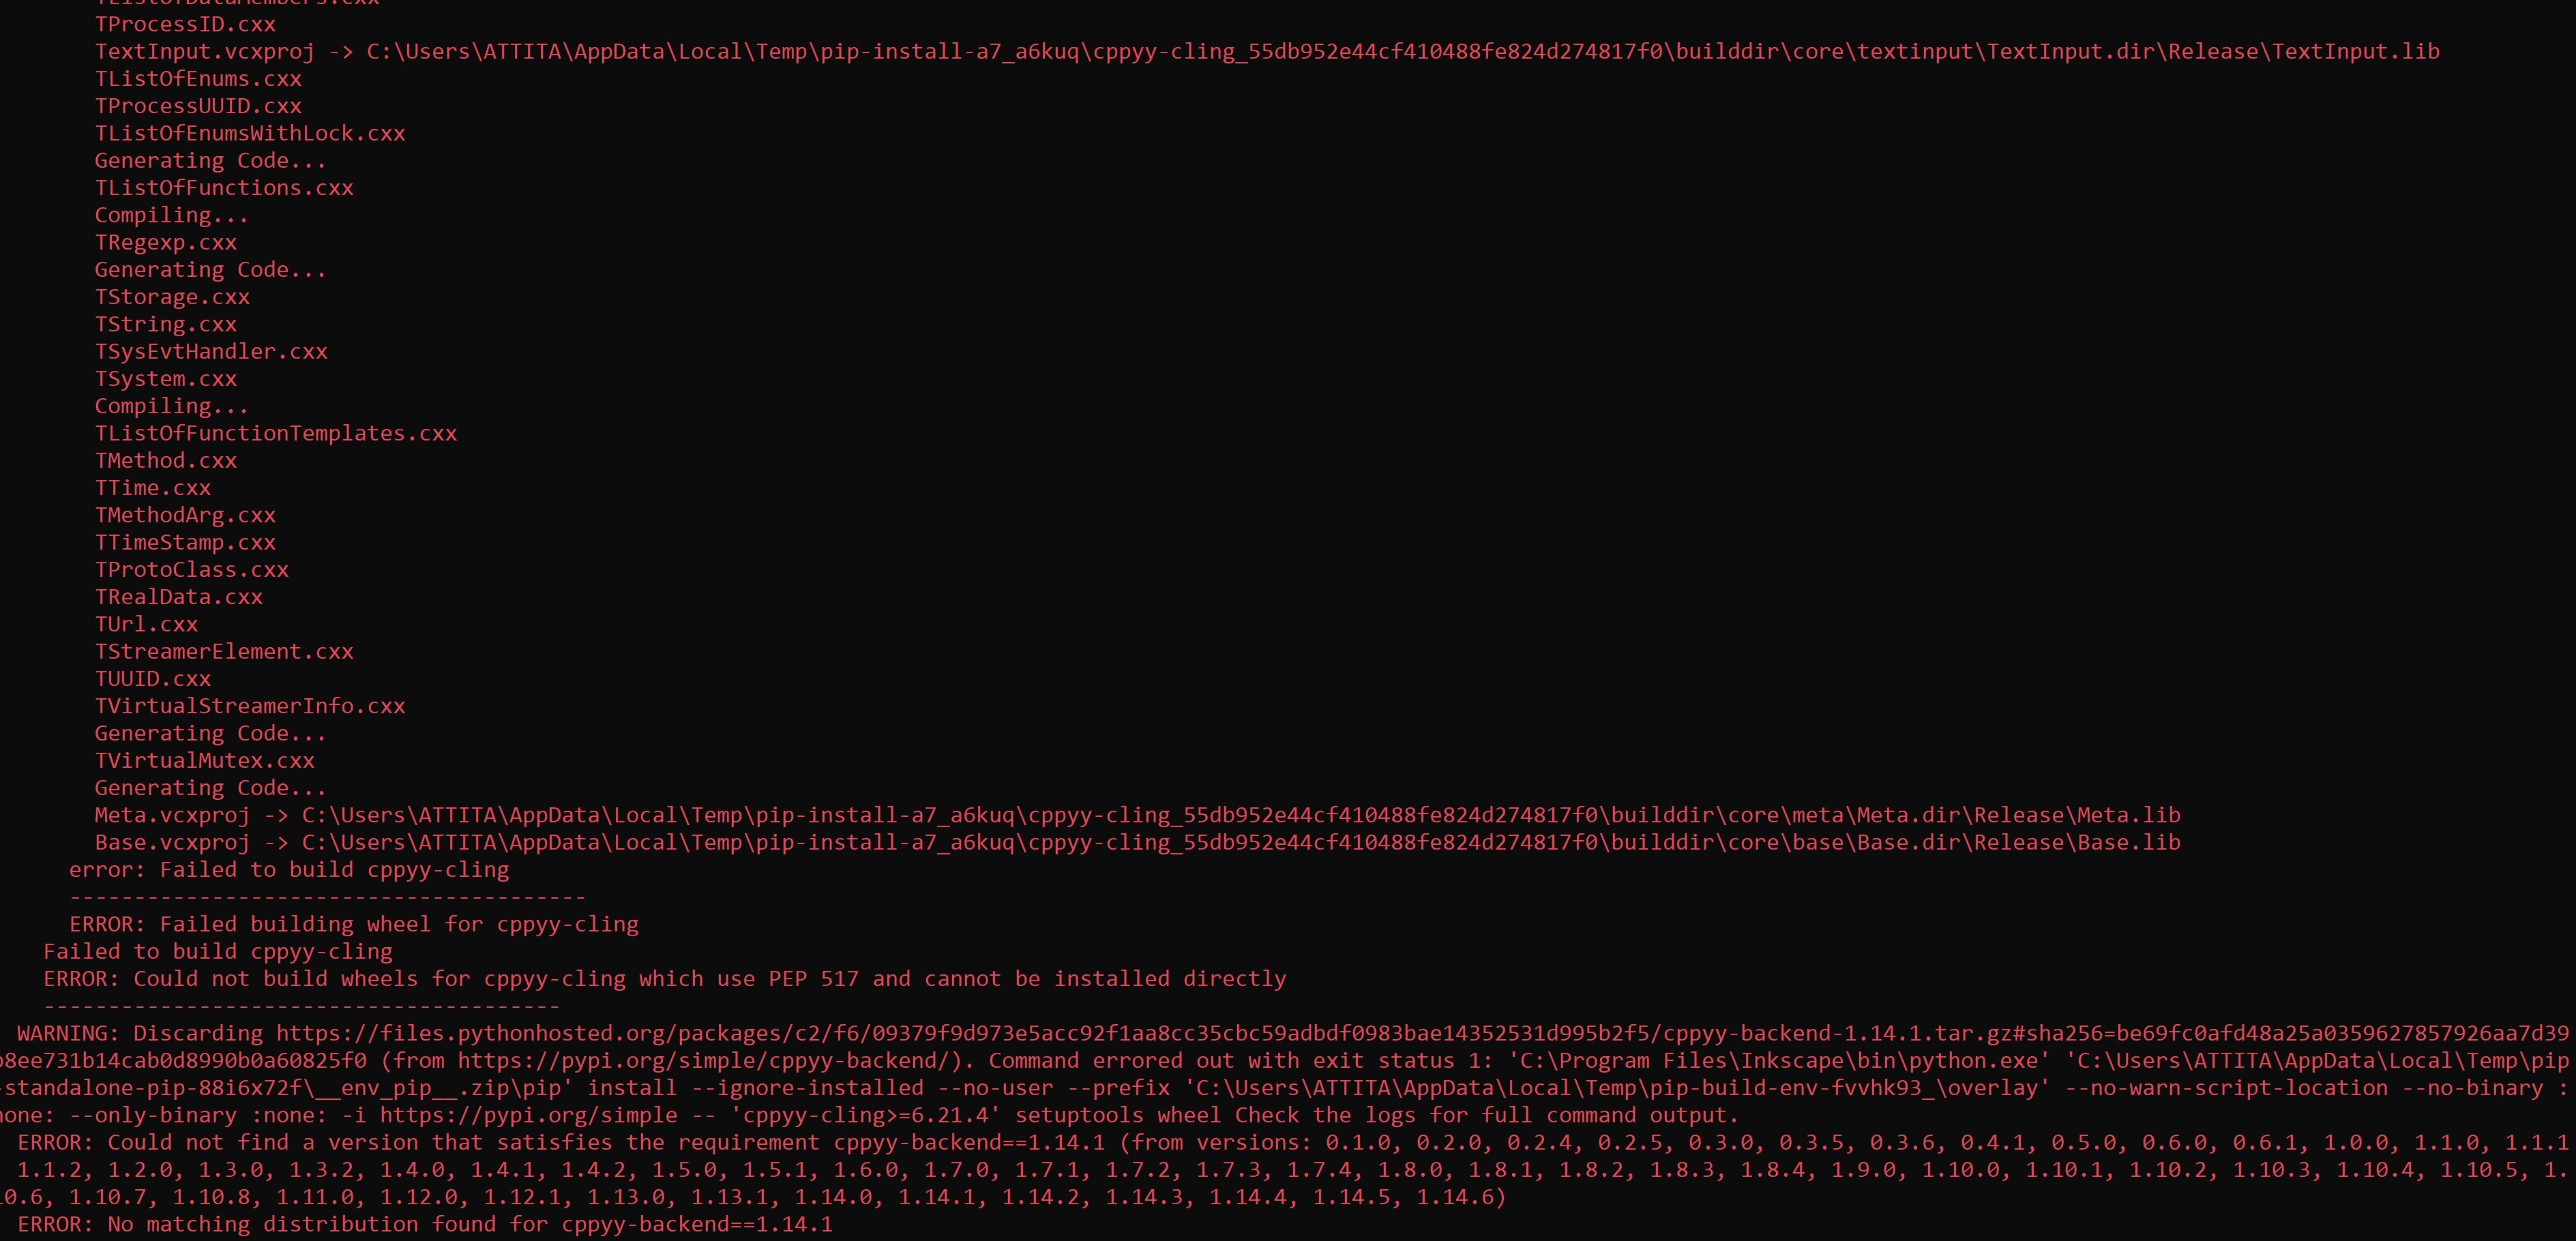
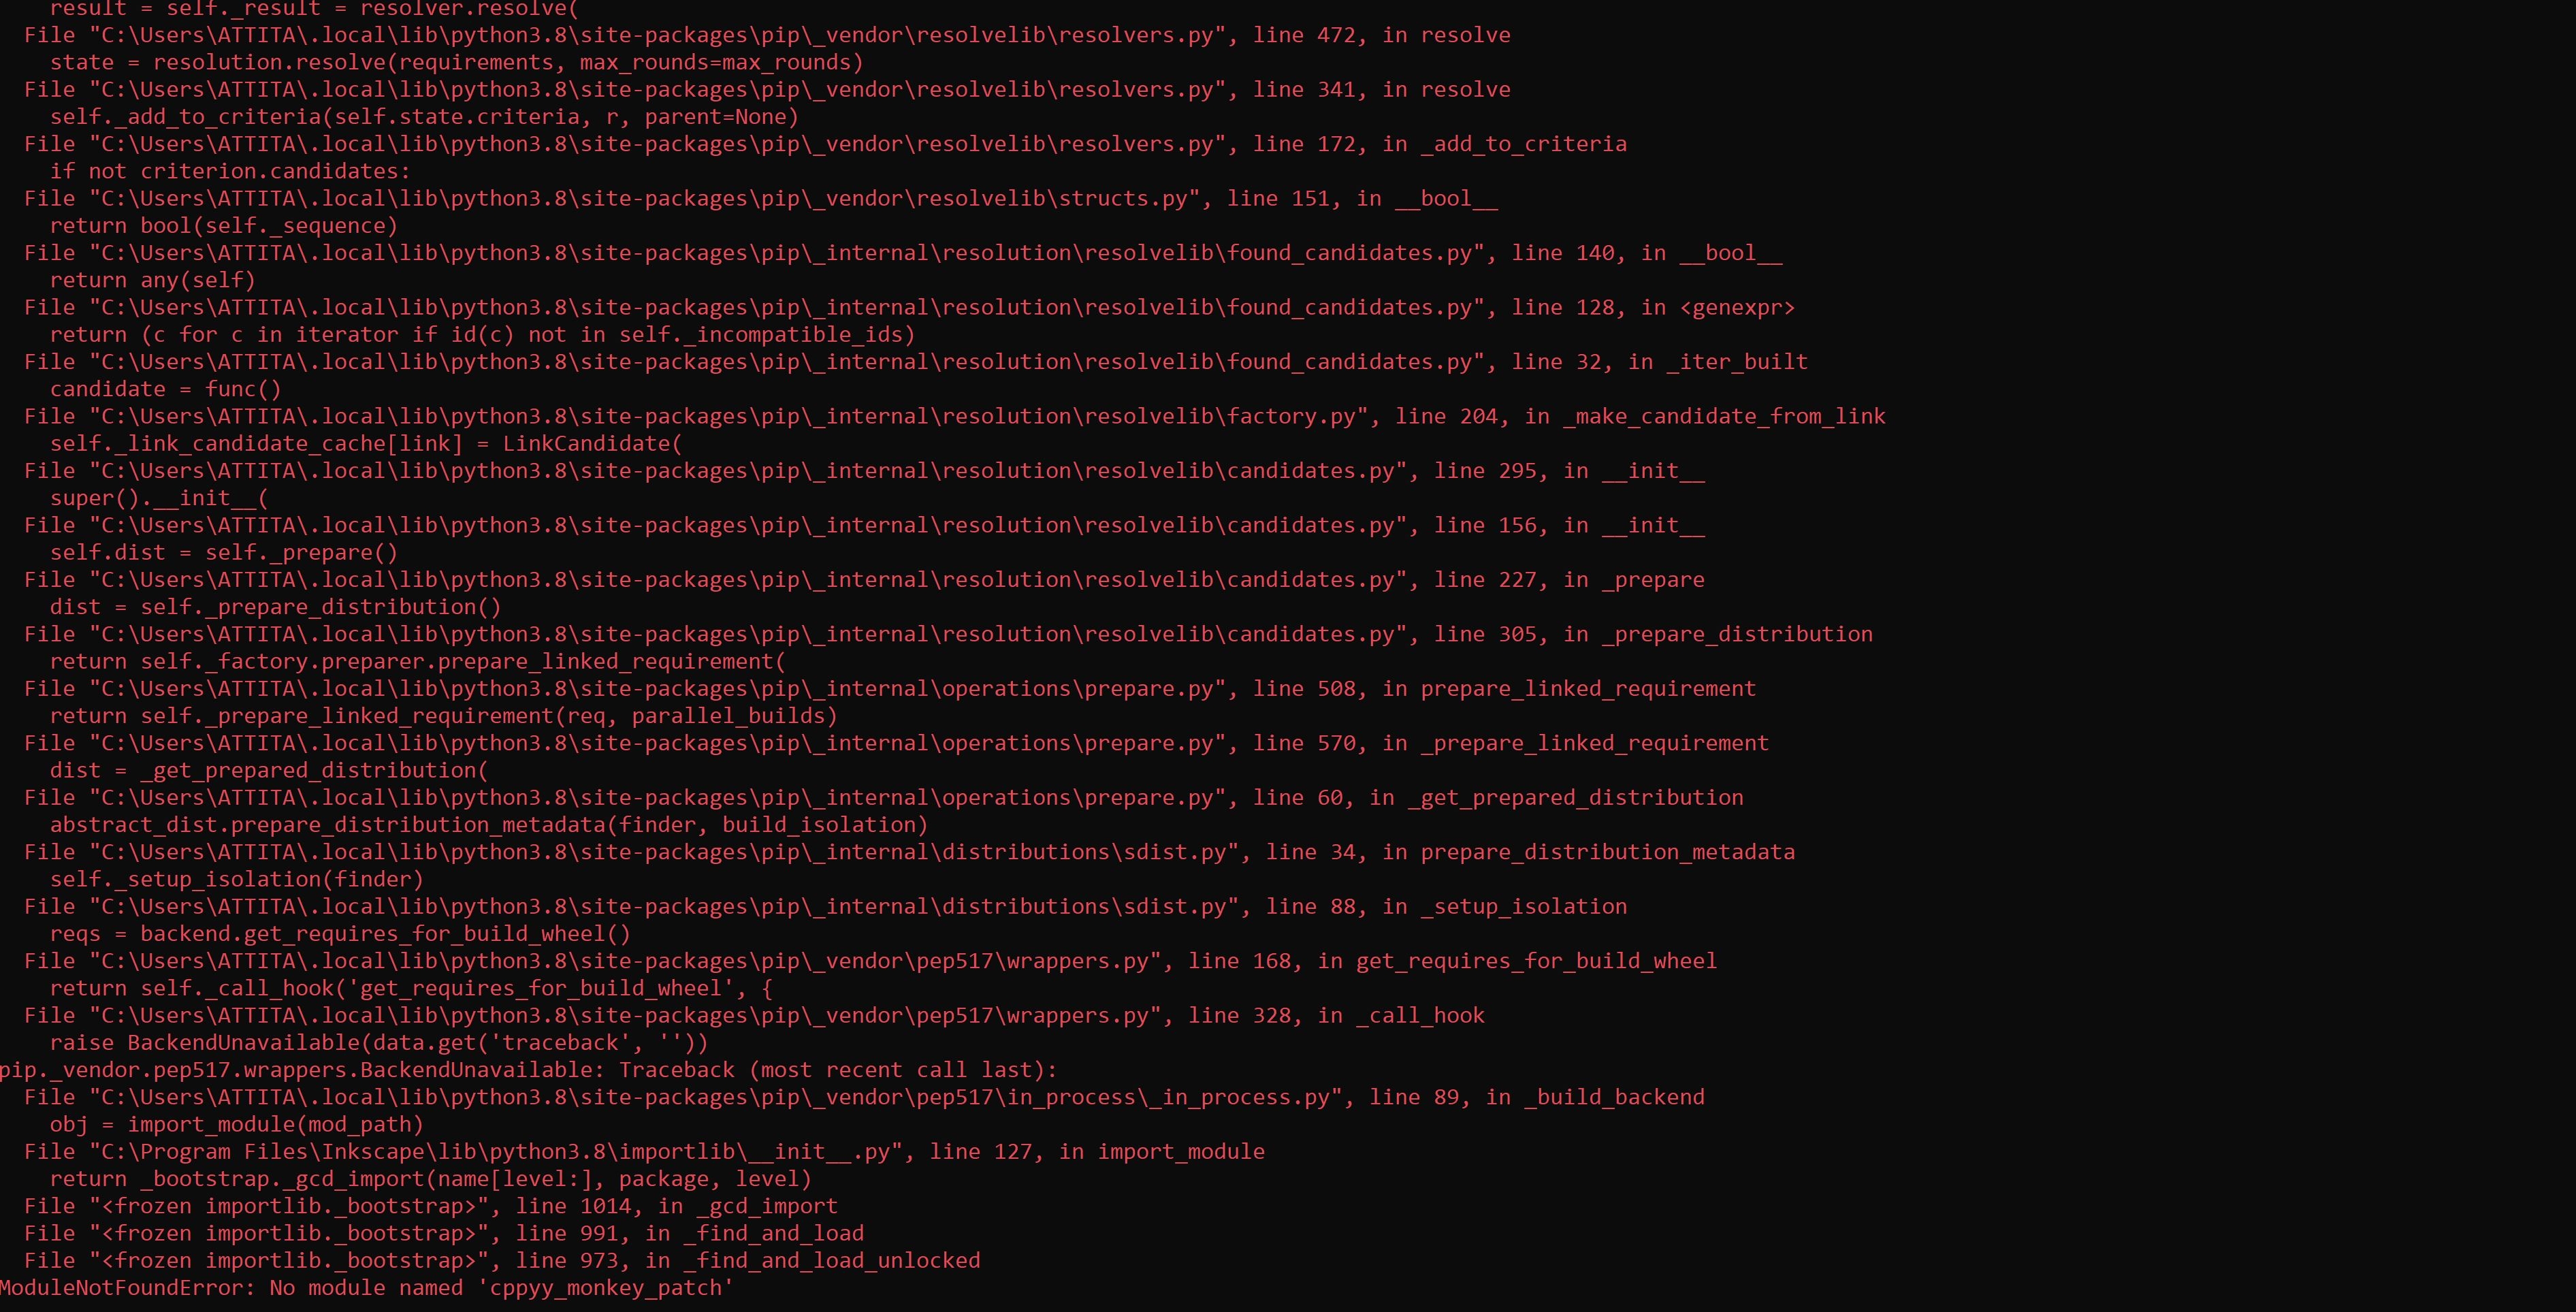
It stays stuck on that forever and then throws errors
It appears using conda to install in a virtual environment is what works, I noticed this is what was described for installing for Blender, so I did that and it worked without issues.
Next error was with installing Topologic. Running WindowsBuild.bat after cloning Topologic from git throws this error:
CMake Error: CMAKE_CXX_COMPILER not set, after EnableLanguage
-- Configuring incomplete, errors occurred!
See also "C:/Users/ATTITA/topologicbim/Topologic/build/CMakeFiles/CMakeOutput.log".
'nmake' is not recognized as an internal or external command,
operable program or batch file.
The system cannot find the file ..Release.
There is actually no \output\x64\ directory and WindowsBuild.bat has the following content:
@mkdir build
@cd build
@cmake -G "NMake Makefiles" -DCMAKE_BUILD_TYPE=Release ..
@nmake
@start ..\output\x64\Release
@cd ..
Also the sequence for installation for Blender is not clear on what part of the previous steps need to be carried out before installing for Blender. For example, do you have to install cppyy globally and still install it in the conda environment for Blender or does the Blender installation suffice?
I'm stuck at this point.
Dear @DADA_universe . Apologies. Yes the instructions are a bit chaotic and out of date (VS2019 is needed not VS2017) because you can install Topologic outside of Blender, but also within Blender. The good news is that today I have been testing the installation on Windows with 3 people that never had Topologic or Blender installed and I think we have finally figured it out and it should be straightforward in three steps. I have posted the new instructions at:
https://github.com/wassimj/topologicsverchok/blob/main/README-windows.md
I have posted the new instructions at:
Sounds good!
Quick feedback however:
https://topologic.app/bin/TopologicSV-WINDOWS-1.0.0.zip linked from the instructions gives a page not found error on the site.
Sorry. Please start at https://topologic.app/link/
Still the same thing.
Ok. Late here. Will fix tomorrow
Thanks!
Hi @DADA_universe Please try: https://topologic.app/bin/TopologicSV-Windows-1.0.0.zip